Wednesday, February 24

Door Signs


Here are some signs I made for the doors at our church. I lamented them, then I put the class name in the circle, teacher at the bottom and the kids names all over! The original file that I created also had our wards name over the top, but I removed it for the post. That would be silly to leave it!

To download the file click here!

Monday, February 22

Golden-plate Cupcakes


When we moved, I made these cupcakes for my daughter's nursury class. They are super simple, and kinda cute. All you gotta do is...
  1. make cupcakes
  2. frost them with chocolate frosting
  3. mix some green food coloring with coconut and sprinkle them on the cupcakes as "grass"
  4. place some yellow starbursts (or other similar yellow taffy) in the microwave for a couple of seconds. Take it out and roll it flat. Cut it into squares, and roll little pieces to be the "rings" on the gold plates. Then arrange them on the cupcakes.

Sunday, February 21

Ladybug Cake!

One thing I love making is cakes!!! They are relatively inexpensive, they taste good, and the creative possiblities are endless! For my daughter's first birthday I made this Ladybug cake. The fun thing is, you don't have to have any one specific pan, frosting, or type of candy. Just use what you can find, and no one will know any different. Heck, I didn't want to buy new cake mixes, so I used three different kinds in this cake (two different layers in the body, and a different mix for the head).

Here's what I used, but you can be creative and use whatever you'd like:
  • 3 cake mixes
  • filling (I just use a can of store-bought frosting)
  • frosting (my buttercream recipe is... 1/2 c. butter, 1/2 c. shortening, 1 t. vanilla, 4 c. powder sugar, and 1 T. milk)
  • frosting bag, round & star tip
  • pipe cleaners (or floral wire)
  • gum drops (for the eyes & antennas)
  • white chocolate candy melts (for the eyes)
  • gummy candies (feet)
First off, I found a glass bowl that seemed a good size for the body and I baked a cake in it (following directions on the package, but extending the baking time because of the thickness). Then I used a round pan and made a second cake to be the bottom layer of the body. I baked a third cake in a small glass bowl, which would be the head.

My secret to a nice, moist cake, is to bake them a few days early and then wrap up the cakes in plastic wrap and freeze them till I'm ready to decorate. Then when I frost them, the little ice crystals that have formed inside the cake thaw, and keep the cake nice and moist. Also having frozen cakes makes them MUCH easier to handle and decorate.
Once ready to decorate, I pulled my frozen cakes out and found a plate big enought to set it on. I put a small amount of frosting on the plate, to "glue" my cake to the plate, then I put the bottom layer down. I spread some of my filling on the layer and put my rounded top layer on. Next, I took the "head" out and carved away part of the cake, so that it would fit against the body. I then "glued" the head to the body with frosting.
With a frosting bag, and a star tip, I piped stars all over the body, in the colors/shapes desired. In this case, of course, I did black for the head and spots, and red for the body. I used a round tip and piped on the mouth and eyebrows. I then cut and bent my pipe cleaners into the legs and antennas, added the gummies onto the ends, and inserted them into the cake. To finish off my lady bug, I "glued" two gumdrops to my white candy melts, and placed them on the face as eyes.

That's it. A simple, fun lady bug cake!

Friday, February 19

Chair Covers


We recently were blessed with a new church building and I decided that meant new chair covers!

1. Purchased about 5 yrds each of Red, Yellow, and Blue fabric (the Primary colors.) Also about 3 yrds of the cheapo muslin.

2. Created my design on the computer and printed onto plain ol' printer paper.

3. Cut my muslin into 9 by 12 inch pieces and traced the pattern from the paper onto them!

4. Colored them with Crayola Crayons. Next heat up your iron, place wax paper over the crayon drawing and carefully iron the image. This will seal the wax crayon into the fabric.

5. Cut my colored fabrics into 8 inch strips and sew sew sewed them into Red/yellow/blue panels!

6. Figure our how far down you want your covers to go on the back of the chairs, double that measurement and add 2 inches for a hem. The cut your panels to this length. BUT WAIT!

7. First you will want to sew on your muslin pocket! I recommend find the center of your panel and putting the pocket 2-3 inches down... of course this will depend on how long you want your covers!

8. Finally place the right sides of your fabric together, making sure you colors are touching themselves. Sew up the sides and hem the bottom!

Yes... I did get fancy and round my corners, but don't worry... even if you don't do this people will think they are amazing! I LOVE the pocket. This way your secretary doesn't have to run around the church handing out rolls or teacher gifts!

To download the images I used for the pockets click here!
To download the images for the Prayer, Scripture and Talk click here!
*Please note that the images I used were from freeldsart.com.
* When tracing I didn't trace the face of the sun, the lines of the man behind the Valiant letters and I put the numbers behind the CTR shield.

Life Saver!


Ok... I saw a lifesaver hand out and thought they were cute, but we noticed that the file wasn't quite the right size to fit around a roll of lifesavers! Silly. So, I create my own! They should fit perfectly and I even cutsied them up a bit!

To download my file click here!

Thursday, February 18

Party Pinata

For my daughter's 3rd birthday party, she wanted a unicorn piñata. I had no idea how to make one, so I played around with a bit of paper maché and streamers and came up with a relatively cute piñata.
*note- the techniques here could be applied to make any shape piñata.

Things you'll need: Poster board, tape (preferably masking), flour, water, paper (white newsprint or white construction paper work well), streamers, school glue (I used good ol' Elmer's), ribbon (or other materials for hair/details)

  1. You'll need to start out by making the basic shape of the piñata. To do this, bend, cut, form, and tape the body. It doesn't need to be solid (the paper maché will take care of that)

  2. Make your paper maché by boiling 4c. water. While it boils, stir together one cup luke warm water with one cup flour (make sure to get all the lumps out). Mix flour paste into boiling water and stir for 1 minute. Let it cool until you can handle it without getting burned. This mixture will last for a few days in a covered container, so you may want to save the extra in case you need it in the next few days.

  3. Tear your paper into strips and dip into paper maché mixture. Cover your entire structure. During this process you can kindof add more shape/detail to your figure, should you choose. Put extra pieces where you will be hanging it from, so that the rope doesn't pull through. Let it dry for 24 hours.
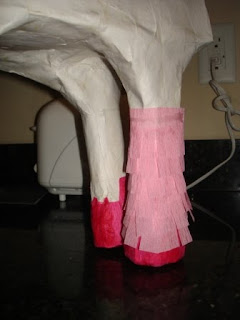
  4. Cut a small opening and fill with candy. Apply more paper maché to the hole.

  5. Cut your streamer into managable lengths. Cut slits in the streamer (I stacked my streamers and cut several at a time). Clue the top edge of the streamer to the piñata and wrap it around the form. Layer your streamer strips until the entire piñata is covered.

  6. Add details (Face, Hair, etc.) For my unicorn's hair, I cut slits in the neck and slid the ribbons in then glued them in place.

  7. Cut holes in the figure and string a rope through (I had to use a hanger to get mine through). Voila! Now hopefully you have a beautiful piñata that has taken you days, and will be destroyed in minutes!

Wednesday, February 17

Primary Teacher Valentines


Being in a Primary Presidency there are those few rare times when you are rushing to get things done right? Ha ha.. Saturday during lunch I realized we hadn't talked about gifts for our teachers yet! What better time to give them out than on a Valentine Sunday! So, here is what I whipped up for my teachers VERY quick!

I purchased Marshmallow Peep Hearts from the grocery store for about 23 cents each. I then created a quick heart with a cute saying, cut it out and boogered it to the back! I hope my quick rush will help someone else!

To download the document click here!

p.s. "boogered" is what I call those awesome super sticky Zot's!

Tuesday, February 16

Candy Cane Heart Sucker


Ok... I know that it's past lovely heart day, but I'm way too excited about this blog to NOT post something NOW! So... our first official scoop at the Cafe is something sweet!

This post is thanks to a friend who noticed my two boxes of mini candy canes left over from Christmas. I know I always seem to buy too many! So... I was given slight directions on how to make suckers with them!

What you will need: mini candy canes, cookie sheet, sucker sticks, wax paper, and an oven! (*I used kabob sticks and cut them cause I'm cheap and didn't want to go out and buy sucker sticks!)

Directions:

1. Preheat oven to 290-305 degrees

2. Line a cookie sheet with wax paper and open you candy canes. (duh to the second part right ;)

3. Place two canes together in a heart shape! (Make sure to leave room for the sticks!)

4. Place in heated oven and bake until slightly melted. (I've been told 5 min on 290, but I needed 7 min on 305! My advice... place a timer on 5 minutes and if they look good... take em out!

5. When they are done place you sucker stick on the point and pinch together the hot candy! (Please be careful. Burnt fingers are ouchy!)

6. They don't take very long to cool and they are yummy!!! (Unless you don't like cane canes, and then you are just plain weird!)

Be Creative! Try crushing and filling your hearts with leftover large canes for a new look, or make rounds suckers out of the fruity canes!