Showing posts with label Fall. Show all posts

Friday, November 12

Thanksgiving Door Swag

When unpacking my Thanksgiving decorations I noticed that I don't have a wreath for my door!  I'm very happy to report that the naked Thanksgiving door problem was rectified as quickly as possible.  My door is not naked any longer!
 Here are the main portions of the swag.  I actually got them for FREE when we lived in Alaska.  The Family Support Group on base had JoAnn's Fabric's donate a ton of stuff.  We were to show up and then take what we want!  It was crazy.  The 2 smaller wreath looking things go around the base of a candle.  I like the Wheat Bundle, but it is pretty bland.  I hang it every year, but... I like how it's going to be used from now on!
 To start I grabbed 5 different ribbons from my stash.  They were all 2 yards in length.  I knotted, them in the center, on the hook of the Wheat Bundle.
 Here comes the tricky part.  I will attempt to show you how to do a 5 strand braid.  Please keep in mind that since my ribbons are all different textures it doesn't come out looking like a traditional 5 strand AND I do this really loose at first so I can show you how to do it.  I then undo it and tighten it for the real thing!  lol  
Start by separating out all your ribbons.
 Start from the left side and take your outside ribbon under one ribbon, then over the next, then under again.
Then on the right, to the same with your outside strand.  Go under, over, under.
Then back to the left outside strand.  Under, over, under.
The right outside strand....  Under, over, under....
Just keept going until you have your length.  Here is where I stopped... undid the loose one and did it for real. 
 Here is what it will look like finished.  Instead of just knotting the end I took a 6th color ribbon and made a bow.  
(Now... I'm guna back up and show you how I added on my mini wreaths!!!)
 After braiding about 6 times (left, right, left, right, left, right)  I took 2 strands and wrapped the over the top and the other 3 went through the bottom and then started braiding again so the wreath was stuck inside!
Here is a larger view of the back.  I hope that this gives you more of an idea how I did it.  I braided and added wreaths on both sides and then....
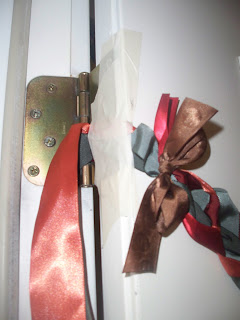
See my fancy expensive way to hang it?  I know...  you are all coveting this right?  Painters tape!  I'm so weird... 


Thursday, November 11

Recycled Charcoal Grill

This one took me a while simple because I... uh... McGuivered my way through it!  Now that I figured it all out it should be easy cheesy to copy!
Here is my "new" Charcoal Grill.  I found it on trash day... I LOVE trash day!  Can you see how wonky it is?  I tightened the screws to the legs after I took the picture.  This is it all steel wool scrubbed and hosed off!
I took off all the racks on the inside and removed the handles.  The spray painted it with some red paint I had at my house.  I had 2 cans.  I thought they were the same, but one was a "velvet" paint?  Anyways... It was AWESOME!  I used the other can to do a 3 inches space on the inside rim.
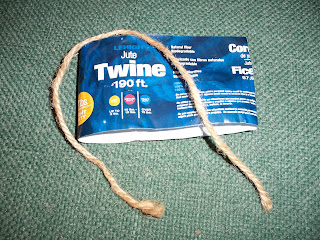
I then used this twine and some Gorilla Glue to cover the legs.  I started by putting a small dot near the top of the leg. 
 I single knotted the twine and wrap, wrap, wrapped it around and around and around!  lol  Every now and then I would add another thin line of Gorilla Glue every now and then just to help it hold.  I had just enough to finish 3 legs.  Purchase one came here,  The new spool cost 1.97.
I used some burlap to cover the bottom.  I cut a piece about 1 inch wider and wrapped it around to the bottom side.  After pinning it I noticed the one side was bent.  I swear it isn't as noticeable in real life!  I left it...
I used dark brown embroidery floss to sew it into place.
I then used some heavy duty craft wire and some beads to...
Make a new handle!
Originally I used only 1 piece of wire.  I ended up threading 2 more though and then used some pliers to twist them tight.
I chucked the bottom drip pan when cleaning it.  I just didn't want to deal with the nasty ash more than nessecary.  I had a wicker paper plate thingy that was taller than the rest.  I found a cake pan to fit it at the thrift store.  Purchase #2 was .25 cents!  
I used my not as niftily textured spray paint on the wicker tray and then used the same craft wire and some beads to the sides.  I put one on the front and 2 on the sides so that I could take the pan out to clean it if I needed too.
I strung opposite sides of the wire through were it looked alright and twisted them back together.
Here is a shot of what the back of the pan looks like.  Easy to get that pan in and out!
To solve the problem of the gigantic holes where dirt would FOR SURE come pouring through I emptied a bag of dirt in a separate container and then cut the 2 main portions to size.  I then used my scissors to cut one small slit where almost every hole in the bottom was.  I had one bag, but needed 2 more to fill the thing!  My husband argues that I shouldn't count the cost of dirt in this project, but...  Just in case...  Purchase #3 was 6.47 for 2 bags.
Here is the old container before I put it into the new pot...  I'm pretty sure there is no question why we never got tomatoes!
 This picture was taken about a week and a half after the plant was transplanted.  Doing much better right!
I'm not sure we will ever get tomatoes from this plant, but...  I still love my planter!  I can move it in or out and have Cherry tomatoes all year round!


Thursday, September 30

Guest Post - Easy Fabric Wreath

Welcome to my little sissy, Banana Sherbert!  lol  I'm so excited to welcome her to Sherbert Cafe!  Originally this blog was going to be between me and ALL my sisters, but... you know how life goes...  Blah Blah...  Anyways.  Banana Sherbert came up with this amazing wreath and has promised to make me one for Christmas.   (At least I think... *Hint Hint)

Step 1: Bend a wire hanger into a circle-ish shape
 Step 2: Pick your fabrics!  They can be anything from coordinating seasonal colors, scraps, tool, fleece, ribbon, whatever you want.
 Step 3: Cut or tear fabric into strips. Cutting them looks more uniform, tearing will give the frayed shabby chic look.  Length and width of strips is up to you! I made my tool trips about 5 inches wide and fabric strips about an inch and a half. Both were around 8-9 inches long. The longer the strip the fluffier the wreath. 
 Step 4: Single knot tie the strips on, alternating each pattern. I did three of each pattern so they would show up in bigger chunks. Push the knots as close together as you can for maximum fullness.


 Step 5: Take a coordinating ribbon and tie a big bow at the top or side, you could also put a flower, seasonal decoration (Pumpkins, Christmas ornaments, small flip flops for summer, American flags), or a combo of any the above. I just happen to have the Howdy sign and thought it would look cute in front since the colors matched :)
You can bend the hanger hook back so it wont be seen and hang with a ribbon or just bend it till its mostly hidden and hang the wreath by the hook so your ribbon/ornament can be off center.

Isn't she wonderful!  I LOVE the Howdy sign!  I love the colors.  I love the price!  You could easily make this from scraps and a dry cleaning hanger!  Banana Sherbert is having a baby in December so.... I'm hoping to get more of her ideas for her baby!  Good luck little sis!

Tuesday, March 9

Fall Hand-print Trees


Ok... so this isn't as much crafty as it was a fun way to spend time with my kiddos. It started when we made hand-print turkeys! They just enjoyed it a little to much. They started tracing away and of course then wanted me to cut them out!

All I did was tape a paper trunk to our wall. After I cut out each hand-print I would put tape on it and they took turns putting the "leaves" on the tree and tracing more hands. Took us quite a while, but they had sooooooooo much fun!