Showing posts with label Clothing. Show all posts

Monday, June 25

Disney Trip Bleached Shirts

Do you remember my Disney Star Wars Weekend Shirts where I was to busy to take real pictures because I had to crank out the shirts?  Well... here is ANOTHER one!  I used almost the same method for these!

I know you have seen those tutorials out there using freezer paper to make amazing shirts right?  You know.. the ones where they take the time to iron down the paper images?  Well...  I did ALMOST the same thing here.
  1. I googled Disney coloring pages.  
  2. Printed one out on regular paper. 
  3.  Cut out the character and laid it flat on the shirt!
  4. Then I filled a spray bottle with a little bleach.
  5. Then I QUICKLY sprayed the shirt 3 times, rushing before the paper got so wet that it curled!
 
See...  I had no freezer paper and no time to iron and it worked!  Hello Princess Aurora!
I think Buzz likes my idea.  He turned out great!
 
Dumbo probably wishes I had used freezer paper.  I over sprayed him and his trunk got a little messed up. (Honestly I did him first cause if anyone's was gonna mess up I wanted it to be mine.  I learned quick!  NO over spray!)
Moglee and Baloo!
Mofasa!  Look at those whiskers!  Crystal clear!
See!  All together!  Even though the shirts were all different colors it made it so much easier to find each other in a crowd! 
 And don't worry.  I found a competent person to take our picture in front of Cinderella Castle later.  Really... if someone asks you to take their picture in front of something... chances are they want ALL of that thing in the picture!  TURN THE CAMERA DUDE!  After asking 3 different people on 3 different days and getting the castle in NONE of those, I began offering to everyone I saw if they wanted me to take their families picture!  I even made a young married couple kiss!  They seemed highly embarrassed, but obeyed and...  the picture turned out so cute!  They loved it!

Friday, June 15

Star Wars Disney Weekend Shirts

Ok... I am a little mad at myself for not taking more pictures of this.  But I WAS in a huge hurry to just book out the T-Shirts before our trip to Disney World!

I decided to do some quick Star Wars T-Shirts since, lucky us, we happened to be going during Star Wars Weekend!  But I had a tiny problem.  I had 2 days left to finish packing and making 2 more sets of shirts!  So... I went with something easy.  A Freezer Paper Stenciled shirt!

It sounds great until I realized that I had no freezer paper and couldn't go to the store because the baby was sleeping.  GRR!!  I wanted to finish the shirts before the kids came home from school and my brain began to wander!

So what to do when you have no freezer paper?

1. Google images you want on your shirt.

2. Import to a Word program and make the pics as big as you can!
3. Cut the image out of the middle.  LEAVE the white part of you paper alone.
4. Lay T-Shirt out flat and place paper with image cut out on top.
5. Spray CAREFULLY with fabric spray paint!  (Stay a good distance away so the sprayer won't blow your paper.  Also make sure you are spraying directly down.)
6.  Pick up paper!

Yeah...  Not my best tutorial.  I may have to make some more shirts this way later just to prove that you don't really have to have Freezer Paper.  
Truthfully...  It would have been nice to have.  I cursed, in my head, when I picked up the paper for this Yoda shirt.  But... as it dried the light saber looked MUCH better.  You can sorta see where the fabric is wet around the image from the paint.  It freaked me out a little!
The Princess Leia image turned out perfect!  I think the key is to NOT over spray.  I was using copper so the contrast was perfect with one light coat.
See!  Even a complicated image like Darth Vader turned out fine!  But... I will admit that for his I used some tape rolled up to make sure the lighter paper pieces wouldn't blow away.  Not a ton though!
We got lots of comments on our shirts AND it made it much easier to find each other in the crowd!  
We even met a few Star Wars characters.  We skipped Vader...  his line was about 2 hours long!


Monday, June 11

Faux Tie Dye Mickey T-shirt


This has got to be one of the simplest shirts I did for our trip to Disney World.  It was a blessing because I had planned to create our shirts in the 2 weeks leading up to our trip.  Then we had to move our trip up and I had 5 days to make shirts and change reservations around!  Rgg!

I found the idea somewhere else, but I seriously can't find the link anywhere!  
They did theirs by rubber banding the shirt around a cup for each circle, but...  I found that took to long and was unnecessary!   I simply traced around 3 bowls for my mickey head.  Then I went back over it one dot at a time, pressing firmly, but not to hard.  The idea for me was to make the ink soak into the back side of the shirt too.  I did make sure I had newspaper behind the shirt.
Then I filled this tiny sprayer with Alcohol!  Any sprayer will work.  This is just my tiny portable multi purupose one.
Then I got to spraying the shirt!  The alcohol makes the marker spread creating a super easy and much less mess Faux Tie Dye!  It's so easy!  You could really do any design.  AND your kids could do this on their own two!  Imagine this with tons of colors!
 I think this is actually the back of this shirt which I did end up spraying separate, because the alcohol dries kinda quick.
The more Alcohol the more the color spreads.  After this just iron to set the color and... make sure you wash separate the first time.  

Monday, April 23

Spring Jelly Roll Skirt

This skirt was so easy to make that...  I am totally about to make her another one!  She is very much a girly girly, although...  she LOVES getting dirty and will pick up lizards before her brothers do.  We had to create rules about how to act in a skirt!  Ha ha ha!

What is a Jelly Roll?  In the quilting world it's the term used for a pack of 40 different strips of fabric, each measuring 2 1/2'' by the width of the fabric.  They are all "rolled" together and tied.  They are fun to use if you like a scrappy looking quilt.  You can use them for binding or...  This Spring Jelly Roll Skirt!
To start I picked out 11 different strips.  They are 4 times longer, but just folded up so it was easier for me to switch around their order.
To start I simply started sewing ALL the strips together!  It shouldn't take you to long.  The pic above they are sewn and the whole thing is folded in half.   When you fold it in half you are going to have some strips that are longer than others.  Square it all up AND cut along your fold so that you have two pieces.  
Next flip one of your pieces different colored strips are touching.  Sew the sides to create a big circle!
The next part was to easy I forgot to take pictures!  I hemmed the bottom.  The I folded over the top about 2 inches and then again about 4 and sewed to create an elastic casing.  Above is it pictured WITH the elastic.
Last I added made a bow out of the pieces I had cut off.  It is really just a loop with a blue scrap square sewn over the middle to keep it looped and in place!
She was so excited!  I tried to get her to wear it a little higher, but... it is her skirt!  So...  she will wear it how she pleases!
She ahs to much fun being my model.
Yep...  she had to wear it to school the next day!

Sunday, April 22

Tights to Ruffled Socks Tutorial

Recently my daughter found these tights and wanted to wear them, but... they are defiantly to small for her.  She had gotten tall lately!  But... the feet fit her ok so I came up with this idea.
I laid them flat and snipped off the feet above the knees.
Then I Zig Zagged the edges and sort of stretched the sock as I fed it through.  I went around twice to secure it and to make sure you could see the cute green thread a little better.
See... it ruffles the top down!
Here they are done and on her!  Without the waist part the slouch A TON more than usual, but...  now the are socks so they don't have to stay up!

Wednesday, February 22

My Glittery Shoes And Belt

I have been obsessed with the idea of decorating shoe for forever.  Honestly, if I could pick my dream job it would be Shoe Designer!  But for now I am fine with finishing getting the hubby through school and raising the kiddos.  Craftiness of the side is fine with me!  Anyways..
Re-crafting shoes is way fun for me.  Each shoes creates is own challenge.  If I had cable I would totally be watching that new show  Project Accessory.  I'll bet it just as awesome as Project Runway!  (Which my parents DVR and save for when I come to visit.)  Anyways... on to the shoes and this time... A BELT!

I started with the belt because it was going to be more of a pain to paint!  He he he!  I bought this at the thrift store for $.25.   I knew I could think of some way to redecorate it! 
 I started by putting some regular craft paint in a cup and mixing it with some Mod Podge.  I was out of fabric medium...
I just painted over the whole thing on one side.  Grommets and all!  
Did you notice in the last picture that the belt was denim?  The grain in the fabric gave it a cool leathery look after being painted.  I almost left it, but I already have a real black leather belt!  Anyways, I set that aside to dry while I  got the next step ready...
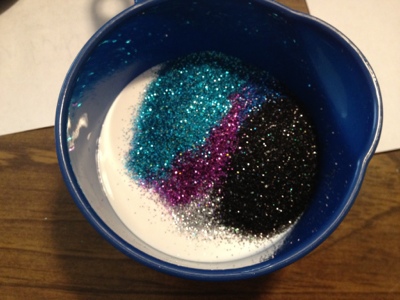
The glitter!  I like glitter.  Glitter is my friend.  It is just fun!  I poured about a 1/4 cup of Glossy Mod Podge into a measuring cup and then dumped in a GOOD amount of glitter!
Here is what it looked like stirred up.
For the belt I really glopped more than painted the glitter goop on.  I covered the loopy near the buckle, but left underneath plain.  More because I new it wouldn't show and it would have been a pain to paint then because  it was a good design choice.  I did attempt to work around the grommets this time, which meant the shoes had plenty of time to dry while I worked on this!
Here is the belt drying!
Here is the belt dry!  And.. the back to show you what it used to look like.
And here it is worn by me!  Easy way to jazz up a simple denim skirt!

Now... for those shoes... These I got at Old Navy when they had one of their 50% off Clearnance sales.  They were 5 bucks.  They normally aren't my type of shoe silloette.  I like them skinny and higher!  But...  I was shopping for pregnancy clothes and these were good for pregnant feet!  But... I haven't worn them since the pregnancy 2 years ago!  
  I wasn't picky about brush direction I just went for it!  Above is a shoe with one coat and a shoe with no coats of glitter!  Notice the belt drying in the back ground?  I worked back and forth on these depending on which was dry... the belt or the shoes!
Here is the first coat dry!  They look pretty awesome already!  But.. they definitely need at least another coat.
Here is coat 2 almost dry.
Here are the shoes done!  Wow... in the post that seems fast, but...  It took ALL FREAKING DAY!  LOL  I did super fun house work in-between and... got locked out of the house after getting the kids from school.  We waited an hour outside for the hubs to get home.  It just gave the shoes PLENTY of time to dry in-between coats!


Monday, January 9

Bleach Stencil For Dummies

We have all seen the bleach pen trick around the blog world or on Pinterest!  Well... here is a tip for those of us who are NOT good at drawing!  My parents live in Texas and have discovered a scorpion problem in their new house.  To fix that my dad has been obsessing over chickens.  I found some awesome scorpion print flannel and made pajama pants for christmas.
 I needed a chicken shirt for my dad.
Umm...  print out an image...
and trace it with your bleach pen...
Then flip it over onto your fabric and lightly press.
Then lift the paper.
Then touch up.  And  I added words!  Hee hee!
I let it sit for about 25 minutes before putting it in the washer.
Here is the shirt washed and finished!  Looks great with the scorpion pants huh!