Showing posts with label Kiddos. Show all posts

Saturday, March 30

Fabric Scripture Cover and Nerf Bandoleer


Hello to all my fabulous readers!  Today I though I would share with you two projects I worked on a little bit ago.  And by a little bit ago I mean... over the Christmas break.  Both were made with scraps from my momma's stash.  Gotta love the stash, especially my momma's!
First up is a scripture case for my daughter.  She had just turned 8 and got baptized while we visited my parents over Christmas break.   It was nice to have family around.  As tradition, in my family and many others, we purchased her very first set of nice scriptures.  It is a Quadruple Combination with the King James version of the Bible, The Book of Mormon, The Doctrine and Covenants, and the Pearl of Great Price.  She was so excited!  Along with this I decided to make her a very special scripture case so she could show them off even more.  I didn't have a pattern.  I just kinda went for it but I think it turned out super cute!  She gets lots of comments on them!  I am so proud of her choice to get baptized and to be such an example to her little brothers.

My parents got my three year old nerf crossbow for christmas.  The packaging says "For 12 years and up" so naturally we let him practice when ever he wants.  We did learn early on that he should aim from a few feet away cause... this baby smarts when he sneaks up behind you!  LOL
Of course with such a fun toy comes a storm of hidden nerf darts behind the couch, under chairs, in the dogs fur, I found one in the fridge?  Anyways, there is also the added frustration that a 3 year old is expected to run back to his ammo stash on the couch every time he wants to unload!  How horrible!
I made this simple Nerf Bandoleer by measuring around his shoulder and hip at an angle.  Then I folded over long strip of fabric and sewed it shut.  The "bullet" holders I made using a super long piece of stripped fabric!  The strips made it easy to measure how far apart I needed to sew the little bumps the nerf darts went into.  
You know... I should do an actual tutorial on this!  Give me a bit.  The move to NORTH DAKOTA is making a few things difficult.  Sewing is one of them!

Anyways.  Thought I would share!

Tuesday, September 25

Cookers Sand

Welcome to
Tummy Tickled Tuesday!
Where I share a fun recipe!

This weeks recipe is defiantly not edible but will tickle you tummy by way laughter to your ears! 

So my 3 year old grabs my hand and brings me in the kitchen.  Then he gets a chair and pulls it up to the counter so he could see and says, "Mommy!  Lets make something!"  After searching my parents house, we are visiting, for a cookie or cake mix I remember something my friend posted to Facebook.  We had so much fun that we had to share!  

This is technically knock off Moon Sand, but my baby kept calling it Cookers Sand!  I guess because he wanted to cook and it is made with mostly flour?
I must warn you that this is more of an outside fun.  Or inside with a large bin and a towel under you and... your house.    
Start by adding 7 cups of flour and 1/2 cup of baby oil to a bowl.  I had him do the counting and measuring so that tells you how strict this rule is!  We used a spoon to stir it up at the beginning then took it outside.

Next we mixed by hand!
Add more oil if it isn't wet enough.

A good test would be to make a ball and if it holds... DONE!

Yes... the boy is in his undies!  This is a lot like playing in actual sand and we didn't have a large tub to mess around in.  He had a ton of little toys that he would bury, then spin the bowl and then hunt for again!  Serious fun!  We did make a big mess, but most of it stayed in the bowl.

For storage we just kept it in the air tight bowl.  A week later and it is still pretty great!

Thursday, July 12

Free Potty Chart Printable

This post has moved to the NEW WEBSITE!  Now it has been updated with 2 more Potty Charts!

Click HERE to be taken to that post!

Monday, June 18

Ice Trapped Toys

So this project I KNOW I saw on Pinterest.  There are a TON of  links for it on there, but...  it is seriously so much fun that we just HAD to share with you!

We started with these little disposable tupperware cups.  Right before we started getting ready for bed on night I had then walk around and find little toys.  Then we put in some ice-cubes to help spread the toys around!  Also...  the ice-cubes melt faster.  We left them in overnight and...
This is what we had in the morning!  Poor Simon.  He is trapped!  Don't worry.  We can fix that!
Here are Aurora and Tyton's!
I ran the cups under hot water to get them out.  Then I places each ice chunk in a big bowl.  
I put a towel on the floor and handed each kid a spoon and a butter knife!  While we chipped away we watched a show from the National Geographic on Antarctica.  The kids were strangely into it...  while watching we talked about ice and water and glaciers.
Tyton was the first to get a toy out!  Yeah Pirate coin!  You are free to clutter my house once more!!  This was so much fun.  If you haven't tried this you should NOW!

Monday, June 11

Faux Tie Dye Mickey T-shirt


This has got to be one of the simplest shirts I did for our trip to Disney World.  It was a blessing because I had planned to create our shirts in the 2 weeks leading up to our trip.  Then we had to move our trip up and I had 5 days to make shirts and change reservations around!  Rgg!

I found the idea somewhere else, but I seriously can't find the link anywhere!  
They did theirs by rubber banding the shirt around a cup for each circle, but...  I found that took to long and was unnecessary!   I simply traced around 3 bowls for my mickey head.  Then I went back over it one dot at a time, pressing firmly, but not to hard.  The idea for me was to make the ink soak into the back side of the shirt too.  I did make sure I had newspaper behind the shirt.
Then I filled this tiny sprayer with Alcohol!  Any sprayer will work.  This is just my tiny portable multi purupose one.
Then I got to spraying the shirt!  The alcohol makes the marker spread creating a super easy and much less mess Faux Tie Dye!  It's so easy!  You could really do any design.  AND your kids could do this on their own two!  Imagine this with tons of colors!
 I think this is actually the back of this shirt which I did end up spraying separate, because the alcohol dries kinda quick.
The more Alcohol the more the color spreads.  After this just iron to set the color and... make sure you wash separate the first time.  

Saturday, May 12

Kids Chore Charts

There are so many Chore Charts out there, but I had to share mine!  It has been working like a charm for us so far!  I love having help too!  When I first started thinking of the kids charts I decided that this time I would have to make myself a chart first!  While I never have had complaints about, "Why do I always have to do ____."  I didn't want them to start!   So I made myself a chart first!  To see that post CLICK HERE!

I love having the help and I think it helps them that my chart is right above theirs.  They see that mommy has done hers, so... time to do theirs!  No complaints so far!  In fact, I have hardly any complaints so far.  Maybe it's because they have THEIR chores and they do them sort of as they can. 

Anyways... on to the charts!
I started with 1 batting and 2 fabric pieces cut to 4 x 18 inches.
Then I layered them batting, fabric facing up and then fabric facing down.  Then I sewed around the edges EXCEPT for...
A small hole where I could flip the thing right side out!
Here it is right side out and pinned to stay.  I then sewed again about 1/4 inch from the edge.
I then used my machine to stitch TO DO   TO DO   TO DO along one edge and ALL DONE   ALL DONE....  along the other!  This part you can skip if you don't have an embroidery machine OR if have a steady hand you could use a fabric marker or maybe T-Shirt paint? 
I then hot glue the fabric strip to a Gigantic letter A, because... this one is for my daughter whose first name is Aurora!
I glued some magnets to the back so it could hang on the fridge.
We use cloths pins to mark the chores.  When one is done she moves it to the other side!  I made of for my son too, but I haven't been able to find a Gigantic T yet...  Hmm... 
I like the clothes pins because they have some chores they do every day, but some that I would like for them to take turns doing!  At the end of the week we take those chores off and they draw them out of a bag or bowl or whatever I have handy!  It has been working like a charm so far.   We pay them in nickels, except for the ones like homework...  I give it to them at night and the put the ones they need to do the next day on the other side!  

Saturday, April 21

Sidewalk Spelling Game

We have been thinking of tons of ways for my daughter to practice spelling.  She seems to have a huge amount of homework for a First Grader...  Anyways...  Spelling...
I used some sidewalk chalk and wrote her words on the path leading to our door.  We walk to school and back home everyday so she reads them on her way to put her bike back!  It has been getting warm out so while she had her brother snack on popsicles we play a game!

I shout out a work and she runs to it!  After doing that a couple times she has a turn, but instead of shouting out the word she spells it and me and her brothers run to it.
See!  Look how happy they are AND the are practicing spelling!  YEAH for happy homework!

Wednesday, April 18

Disney Savings Jars

We have been saving for a trip to Disney World since we live so much closer now.  I have been doing several things to help with the cost.  I know that it can be pretty pricey.  One of the main things people have told me to save one a trip to Disney is to NOT buy souvenirs inside the park.  There are many places outside to buy pretty much the same things.  Since the hubby and I have been working so hard to save for this we figured the kids could save on their own for their things!

Of course, a special thing to save or calls for a special jar to put the money in.
First I stained some jars using THIS tutorial.  I used alfredo 2 sauce jars and a maraschino cherry jar for my 2 year old!  Perfect small size.
Using 2 different size cups I cut a mickey shape out of some fabric.  You could use paper, but... I had fabric!
Then I Mod Podged the Mickey heads to the jars.
See!  Cute so far.
Then I used some shiny T Shirt paint to out line the edges.  I wanted the Mickey to stand out a little more.  I set these on the counter so the kids can easily watch them fill.  We don't pay them allowance.  We have them earn nickels for lots of things.  Their chores, doing things without being told, being sweet to each other....   The oldest two can count by 5 easy and nickels can add up fast or... slow!

Wish us luck on our Disney Savings Journey!

Friday, March 2

St. Patricks Day Spell By Color

This is just something I drew super quick for my daughter to have some fun practicing her spelling words.  She seems to end up with an enormous amount of homework for a First Grader, but...  She is my first First Grader, so...  I dunno.  Anyways,  we are constantly coming up with fun ways to practice her spelling words.  I am going to do a bigger post on it next week, but wanted to share this little print out for you!

WARNING:  Incredibly untalented sketcher is about to share with you.  But... it's for kids and it's fun so be prepared to get over it quickly!
This is pretty much a color by number, but I added little lines so that you write each spelling word in a different color to fill in the picture!  For each line you switch and write a different word.  The point is to try and write the spelling words small.   I told her she could do this however she wanted.  I couldn't find her map pencils so we used crayons!  This would look super cool with little tiny spelling words all over it!  

CLICK HERE to download.  

Use the sheet how you like.  Color by number, Spell by Color...  whatever!  Just a fun way so spice up some boring homework!  Obviously, Aurora's version is perfect!  (Forgive the tired look in her eyes...  this is after 1 math sheet, 1 book, and 1 other random homework...  add spelling on... is that to much?  I dunno.)


Friday, February 17

My Baby's Baby Jammies Tutorial

So... my son Grifin has a baby that he has been carrying around for ever.  He loves his baby about as much as his blanket!  He calls himself Daddy and makes me say I am Gramma.  He is very tender and loving with his baby... which is strange cause... he is NOT a very tender, quite  or gentle boy!  Seriously... the kid broke his arm at age 1!
Baby used to be a Girl Baby.  Well, we assume since the clothes were pink.  But, you know what they say about assuming!  We removed the pink clothing and draped a Dinosaur blanket around it so...  now my son has a Baby Boy!  Baby has been this way for over a year and I am constantly rewrapping him because Grifin is sure baby will be cold.  (Of course, he is the one who took the clothes off in the first place!)  Lately Grifin brings me baby and says, "Naked Baby mommy!  Need clothes!"  I keep meaning to, I just haven't, but today Grifin says, "Mommy.  Baby is naked.  He cry.  You make clothes?"  Well... I couldn't let my first grandchild cry from nakedness!  I am horrible at grand-mothering already!!  AHHH!!!
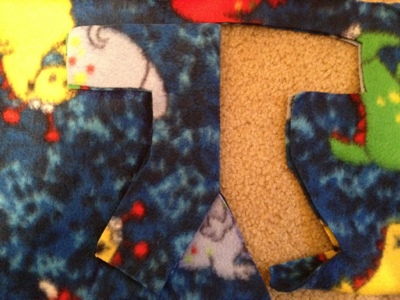
I decided to use the blanket.  It was leftover from some jammies I made my older son when he was 2 and now Grifin fits!  So...  They will be Father and son matchified at night!  I simply laid baby on top of the blanket which was doubled over so I would cut 2 layers.   I drew around baby with a little extra room. 
To be sure both sides were the same I cut half, then folded it over and cut along the edge.
Here it is all cut out.  Remember there are two of these!  I cut both at once!
Then I simply sewed along all the edges... except for where the hands, feet and head poke out.  I didn't hem it because... it's fleece and Grifin was standing right by me jumping up and down with crying naked baby awaiting the clothes!  
After that I just flipped it right side out and shoved the baby in!  HE is pretty squishy.  I didn't even make a scoop down for the neck line cause I wanted it to fit a little snug.  I ended up making a hat too!  (Although... I'm not sure why cause you know it's gunna get lost.)  I just cut off some of the end fringe from the blanket and made sure it would wrap around Baby's head.
Then I sewed it together to complete a circle and put it on Baby.
And used a random scrap to tie around it and finish off the hat!
Look how handsome Baby is!
This is what was left over of the poncho/blanket.
I cut it like this to make it a sort of cape thing that was slightly harder for Grifin to remove!  
Now he is SUPER BABY!
This really didn't take very long and, as you can see, Grifin is just ecstatic to have his little boy back!  I sure love both of them!  And... am glad to have completed my first Grandmotherly duties.
Kisses for EVERYONE!