Showing posts with label Parties. Show all posts

Friday, December 11

Simple Christmas Tree Garland

Our tree has a new Harry Potter theme this year.  I found a copy of Deathly Hallows at a thrift store for free that had cover that was pretty trashed.  I grabbed it to use the chapter pictures in some tiny frames we got to hang on the tree, but I didn't want to waste the rest of the book!

And this simple Christmas Tree Garland was born!

This garland would be simple and easy for any occasion, you just need the right color paper to match whatever theme you need.

To start I used a 1 inch paper punch to cut out a TON of circles from the scrap book paper.  I ended up having my daughter do this to save time!
And my sewing machine is in the shop, right before Christmas... that's a HUGE pain.  So, I used my daughter's sewing machine to create this. That just goes to show you don't need a fancy machine to create this as it only takes a simple straight stitch!
The only thing I recommend checking before you start is your stitch length.  Normally I sew with my stitch length around 2, but since you are sewing paper I would set this closer to a 3.  You don't want to many holes in the paper and have them tear in half as you sew!
Then I just lined up my circles and sewed them together in a row!  Not much to explain here..  I didn't even back stitch the first circle... Just sew away.
When one circles end gets close to the needle, slide the next circle under your foot!  This part helps to have a 6 year old handing you circles one by one...  IF anyone needs a technical cheat.  LOL
The row adds up faster than you would think!  Even with 1 inch circles I was amazed at how fast this went.
Another extremely secret helpful hint I shall reveal to you...
Use a fancy toilet paper roll to wrap your garland around as you sew.  That way they don't all get tangled and it is a little easier to drape around your tree when it comes time to decorate!
Garland should always go on the tree first right?  My 6 year old had to much fun helping make this so we had to put it on right away.  Here is a close up!
Looks pretty good in my opinion!  I am not to picky about exact ornament placement.  My garland draping probably will bother many people considering an 11 and a 6 year old did it.  I just stood back and said, "A little higher...  not so tight..."  Christmas spirit right?  Can't wait to put more ornaments on!  Funny... the rest of the house was decorated the day after Thanksgiving.  We wait a little for the tree because we like a fresh tree.  I just realized how close Christmas is!  We had better hurry!

Tuesday, August 28

Volcano Dino Dig Cake

Welcome to 
Tummy Tickled Tuesday!
Where I share a yummy recipe or cooking tip or... something food related at least!

My son turn 3 last month.  Yes... I know.  He is evil and rude.  All that growing.  I have tried to teach him not to, but... he just doesn't listen!  Anyways, I had a fun Spongebob Cake all figured out in my head and when I mentioned it to him he said, "I no want a Bob Bob Cake mommy.  I want a Dinosaur Cake."  Okay... Dinosaur cake it is!

So one day he was NOT wanting to sit on the toilet and poop.  He doesn't like to wait and I don't like it when he does so...  I sat on the edge of the tub and googled "Dinosaur Cake" pictures!
He saw TONS he liked! But... it was a spewing Lava Cake that caught his attention!  His other favorite cake had non-toxic dinosaur bone toys baked right into the cake! Way cool.  So I told him he would have to choose.

or

Imaginatively, he said, "Mommy.  You can make a Volcano WITH dinosaurs IN it.  You can mommy."
Duh... why hadn't I thought of that!
The cake itself was pretty simple.  Betty Crocker is my friend.  I made two 8 inch rounds for the base.  After layering my rounds I shoved these little guys...
Right into the cake! I didn't want to take the time to run around finding non-toxic toys that I could bake.  So I opted for toxic dollar store dinos that I simply washed! 
Then I cooked a box and a half in a glass bowl for the top!  After letting everything cool I spread chocolate frosting and Oreo crumbs on the whole thing!

Here is the part I wanted to share.  How I made the LAVA!!!
A cookies sheet covered with foil and heavily sprayed with no stick spray.
Then I lined up Life Savers and popped them into the oven for about 5 minutes on 350.
WATCH THEM!  Cause they get to this stage quickly.
WHILE THEY ARE IN THE OVEN carefully use a point thing to swirl the colors together a little bit.
THEN pull the sheet out and slice where needed as the cool with a knife so they will break apart where you want.
Some of them I carefully took out and draped over a bowl so they would cool in a curve!
(Do you like my Fancy Life Saver cooling holding tools?)
When everything is cooled put them on!
My mistake?  Using applesauce in place of the vegetable oil.  It makes the cake moist and yummy, but... with such a heavy tall cake...  Let just say that by the time we were ready to eat our Volcano had.. IMploded.  But...  Still looked alright.  Not fantastic but... A 3 year old doesn't care.  He really just wants cake!

Saturday, July 14

Rocket Cake Tutorial

My baby boy turned 6 in June!  Isn't he mean!  Or...  am I a mean mommy for going on vacation and not giving him a birthday party with all his friends?  I suppose he can't complain.  We WERE at Grandma and Papa's House!  They get spoiled rotten.  We ended up going to Lego Land AND seeing Madagascar 3 for his birthday!  So...  I am NOT a mean mommy for not throwing a party right?  RIGHT!  I am glad you agree with me!

His actual birthday was on a Sunday so we choose to observe the Sabbath and stay home and do the fun stuff on Monday (for which 2 of the 3 kids were sick so... we ended up waiting until Thursday!  LOL)  Anyways, I made him a fun cake to make up for lack of birthday partyness.  He had asked for an astronaut party so a Rocket-ship Cake was in order.  Tyton is NOT a complainer.  To him the party IS the cake, so he was in heaven!
I started with is favorite Fun-Fetti cake.  I simply baked it in a 9x13 pan, let it cooke and dumped in onto a foiled cookie sheet to decorate.
For some reason I didn't get a picture before the cuts, but.. you can kinda tell here what I did right?
I tapered the top two corner off and rotated them to the bottom sides to make the cake flair out like a rocket.  I then used some leftover chunks to make the rocket shooter outer parts at the bottom.
(Note my extremely technical terms there.)
After this I dirty iced the whole cake.  I used smaller blobs as glue to stick the pieces together and then covered the cake with white frosting.
Here I will happily admit to just using the squirty can of frosting for the red and blue decor!  Minus the letters in the name touching each other, which supremely bugged me for some reason, I think it turned out perfect!
I purchsed some twirl candles to stick out of the rocket booster bottom thingys.
And LIT THEM UP!  Looks awesome right!  You should have seen it in person!
See...  Perfectly happy 6 year old.  Even though... he is grounded for growing up!  I love my future astronaut!

Monday, December 13

Tree Wrapped Gifts

This wasn't my idea, but it was to cute to NOT post about!  Our Primary Presidency gave all the teachers thank you gifts for Christmas!  First... A little about our Primary Presidency.  I LOVE them, for several reasons, but mostly because I KNOW they have my back.  If I need help in class or need a sitter during Activity Days...  They are so sweet and have done a Fantabulous job of keeping reverence and teaching the children.  Now... about the gifts!

Saturday, November 20

Beauty Makeover Birthday

My daughter has been wanting a Beauty Makeover Party since she say the Tooth Fairy!  You know...  there is the seen where he has to watch the boy cause the mom and the little girl are going to a party... Yup!  A Beauty Makeover Party!

I was shocked that I was able to do this so cheap.  I understand that  most will NOT be able to do it for this price, but I wanted to post the ideas.  My goal with most things is to try and use what I have available.  All of the decorations were simply things I found around the house.  I tied a ton of her hair ribbons to the chairs and used some pink fabric to lay across where the guest prizes and cupcakes were.  I put a bed sheet over the table (it was gold) and put the flowers that her daddy got her on the table too!   I tend keep my eye out at the thrift stores about a month before hand to save more pennies!  I try to spend a little where it matters and reuse what I have where it doesn't!  

  While I love throwing cool parties... they are over rather quickly.  I think the point is to try and use things you already have around the house.  Little girls don't judge!  They will be to excited about the make up!


As the guests arrived we started with massages!  Every girl needs a massage, perhaps not a 6 year old, but... still!  They were so giggly and ticklish it was a perfect start!
Cost
FREE!!!!  
We used an electric massager we already had.  If you don't have one you could get those  hand ones from Michael's you see all the time in the dollar bin.  Perhaps if could be a gift for all the guests?

Once everyone arrived we began the party with food!  We wouldn't want to mess up our make up right? 

To create the swirl effect I put globs of the white frosting in 3 separate cups and added dye to create the Purple, Pink and Red frosting.  I then put 1 gigantic glob of each color on the top.  I smoothed the outside edge so it would be covered with a butter knife and then used the tip to swirl.  There is a TON of frosting cause Aurora never eats the cake!
Cost
Box Mix of Strawberry - 1.39
2 Cans Vanilla Frosting - .89 each

Since all these Tu Tu's were hanging in the window, they were the first thing each girl asked about as they came in the door.  So... after cake came Tu Tu's!

Most the tulle came from a GIGANTIC black and pink Tu Tu I made myself for an Adult Prom.  The yellow tulle came from the same Tu Tu after I took off the pink to lend it to a friend who added more black and then some yellow.  (She was a Bee for Halloween)  
Cost
3 Packs 1 inch Elastic - 1.29 each
1 10 yard Roll Sparkly Pink Tulle - 1.50
Rest of Tulle - Free from my stash!  
I couldn't tell you the initial cost because I bought most of it over a year ago.  But... the Sparkly Pink was on sale at Hobby Lobby.  So..  about 6 Bucks max a Tu Tu if you don't get sparkly and a shop sales?


 Next we moved on to the Make-Up center!  Here is where they truly went crazy.  My silly girl, who was obsessed with this party for about 2 months, was insistent that she needed a red nose for her clown makeup!  So much for the beauty part?  I let them go for it.  I figured it was more fun for them to just play and be cute little girls.

The seating is just some floor pillows covered with a pink fleece blanket.  The mirror is my full length one that I brought down and put on it's side!
Cost
1 Case of Make Up - 2.99
(It had several different blush and eye shadows and was CHEAP!!!)
1 Case Sparkly Lip Color - 1.99
(Same cheap knock off brand as the face stuff
Q-Tips for applicators - .89
(We were lucky that the cheapest brand was even PINK!!)
Lipstick - Free
(They were all mine from those free things you get when you buy make up)
Makeup Remover Wipes pack of 25 - 1.99
( I put a few in zip-locks for the girls to take home to actually wash their make up off with.  When they wanted to redo their make up during the party we just used my Homemade Baby Wipes!  The make up center just happened to be next to where we change diapers!)
Canopy over the Center - 2.50 from the Thrift Store
(It will go over her bed after the party!)

 After faces came nails!  I set out paper towels so they wouldn't get my bed sheet... I mean... Very expensive party table cloth... dirty.  I did end up helping them the most here.  They all had very interesting ways to paint nails.  It was cute!
Cost
2 Packs of Nail Polish - 1.00 each
Stick on Princess Earrings - 1.00
(These both came from the Target Dollar bins!)

Next to come was their cute socks, but... they were busy sitting on the couch with hands in the air from wet nails!  Imagine 6 little girls in Tu Tu's, with their hands up, blowing on their nails and semi-watching Barbie and the Diamond Castle.  Yeah... they had me just slip them on their feet like the were Cinderella!
Cost
5 Pairs of Socks - 1.00 Each
(Dollar bin at Target)

Total Cost was 26.90!!!

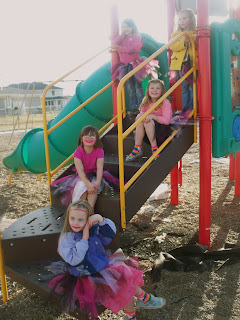
After cupcakes, make up, dry nails, and presents we went out side.  The girls were shocked I was letting them out of the house in the crazy makeup and Tu Tu's!  They had a BLAST at the park!  Here are a few pics from the fun!


Thursday, June 3

Ice Cream Cake Coupon

Ok... so this is more just to share my random thing.  We went to a friends birthday party and I knew he loved ice cream cake.  His whole family had been going on about it for a week!  They had been looking everywhere for the perfect ice cream cake at the perfect price.  Well... of course he was going to have one at his party so I couldn't make him one fore that!  Knowing we would eat dinner with him again later I made this coupon and just wrote our number on the back of it!   Easy digital scrapbooking fun and a good gift!

Notice that I left the age out so that you could put in the age you need for your friend!
This coupon was created using the haPEA Birthday set by Tia Bennett.

When I end up making his cake I shall do a tutorial on ice cream cakes! Stay tuned for actual scoops of fun... not just Sherbert Cafe scoops.  Those are great, but not near as delicious tasting as actual ice cream!

Sunday, April 25

Batman Birthday

My son's birthday isn't until June, but as usual he has his theme all picked out. That got me thinking that I should do a post about his past birthday! Hooray Birthday!

As you can tell by the post that year it was Batman! I try my hardest to do EVERYTHING pretty cheap and us things around the house to create a party. While I'm a fan of huge parties that cost a ton, I'm not a fan of being the one to shell it out! I've learned that you can do some pretty cool stuff on a shoe string budget. Plus... you have to get creative, so chances are your party will have things no other will! That being said... let me roll down the list of what I did!


Invites - $6.00 Total
I traced white envelopes on card-stock (4.00) to create black ones and then wrote the addresses on with a silver pen. Inside were stickers($2) I found at Michael's. There was over a hundred little ones in the pack so I just split them up. I got 1 pack of Batman and another of Little Ponies for the girls! I had blue card-stock on which I printed a googled Batman signal. The wording for the back said:
"Batman has requested
your help on a mission! _____ is
Turning 3, But he needs your help
to celebrate! Be at _____________
from 11:00-13:00 for hero training
on ________________. Please com
in your secret identity. Super
hero attire & fuel (lunch)
will be provided."

Bat Capes - (15.00)
I consider myself pretty handy with a sewing machine, so I bought 8 yards of black fabric for a $1 a yard, (Say $9 including tax?) I bought bought 4 rolls of black ribbon ($4.00) and yellow shirt paint ($3.00) to finish them! All I did was make a stencil with cardstock and sponge yellow bat symbols. After that dried I straight sewed the edges and put about 3/4 yard of ribbon on one end for a tie (I can't find a picture of these, but I know that did gather the top a little so the neck portion would be smaller.)

Bat Cake - $8.00


This on is pretty self explanatory. It's just a chocolate double layer circle cake ($4 for 2 boxes) with chocolate frosting($2 for 2 thingies.) and a yellow bat symbol($2 for 1 tube)!

Bat Cave - $13


Ok... this was everyones favorite part! I thew some black balloons ($4.00) and some black streamers ($3) all over their toy room and pretty much just threw a giant bag of cheap candy ($6)all over the floor. Then they ran everywhere and found the candy! Simple. Cute. Candy!

The rest of the party was simple. We ate dino chicken nuggets($10), the kids ran all over the back yard in their capes and my hubby (who is a wrestler and amateur MMA fighter.) showed them how to defender themselves.
Party Total - $52

Sunday, February 21

Ladybug Cake!

One thing I love making is cakes!!! They are relatively inexpensive, they taste good, and the creative possiblities are endless! For my daughter's first birthday I made this Ladybug cake. The fun thing is, you don't have to have any one specific pan, frosting, or type of candy. Just use what you can find, and no one will know any different. Heck, I didn't want to buy new cake mixes, so I used three different kinds in this cake (two different layers in the body, and a different mix for the head).

Here's what I used, but you can be creative and use whatever you'd like:
  • 3 cake mixes
  • filling (I just use a can of store-bought frosting)
  • frosting (my buttercream recipe is... 1/2 c. butter, 1/2 c. shortening, 1 t. vanilla, 4 c. powder sugar, and 1 T. milk)
  • frosting bag, round & star tip
  • pipe cleaners (or floral wire)
  • gum drops (for the eyes & antennas)
  • white chocolate candy melts (for the eyes)
  • gummy candies (feet)
First off, I found a glass bowl that seemed a good size for the body and I baked a cake in it (following directions on the package, but extending the baking time because of the thickness). Then I used a round pan and made a second cake to be the bottom layer of the body. I baked a third cake in a small glass bowl, which would be the head.

My secret to a nice, moist cake, is to bake them a few days early and then wrap up the cakes in plastic wrap and freeze them till I'm ready to decorate. Then when I frost them, the little ice crystals that have formed inside the cake thaw, and keep the cake nice and moist. Also having frozen cakes makes them MUCH easier to handle and decorate.
Once ready to decorate, I pulled my frozen cakes out and found a plate big enought to set it on. I put a small amount of frosting on the plate, to "glue" my cake to the plate, then I put the bottom layer down. I spread some of my filling on the layer and put my rounded top layer on. Next, I took the "head" out and carved away part of the cake, so that it would fit against the body. I then "glued" the head to the body with frosting.
With a frosting bag, and a star tip, I piped stars all over the body, in the colors/shapes desired. In this case, of course, I did black for the head and spots, and red for the body. I used a round tip and piped on the mouth and eyebrows. I then cut and bent my pipe cleaners into the legs and antennas, added the gummies onto the ends, and inserted them into the cake. To finish off my lady bug, I "glued" two gumdrops to my white candy melts, and placed them on the face as eyes.

That's it. A simple, fun lady bug cake!

Thursday, February 18

Party Pinata

For my daughter's 3rd birthday party, she wanted a unicorn piñata. I had no idea how to make one, so I played around with a bit of paper maché and streamers and came up with a relatively cute piñata.
*note- the techniques here could be applied to make any shape piñata.

Things you'll need: Poster board, tape (preferably masking), flour, water, paper (white newsprint or white construction paper work well), streamers, school glue (I used good ol' Elmer's), ribbon (or other materials for hair/details)

  1. You'll need to start out by making the basic shape of the piñata. To do this, bend, cut, form, and tape the body. It doesn't need to be solid (the paper maché will take care of that)

  2. Make your paper maché by boiling 4c. water. While it boils, stir together one cup luke warm water with one cup flour (make sure to get all the lumps out). Mix flour paste into boiling water and stir for 1 minute. Let it cool until you can handle it without getting burned. This mixture will last for a few days in a covered container, so you may want to save the extra in case you need it in the next few days.

  3. Tear your paper into strips and dip into paper maché mixture. Cover your entire structure. During this process you can kindof add more shape/detail to your figure, should you choose. Put extra pieces where you will be hanging it from, so that the rope doesn't pull through. Let it dry for 24 hours.
  4. Cut a small opening and fill with candy. Apply more paper maché to the hole.

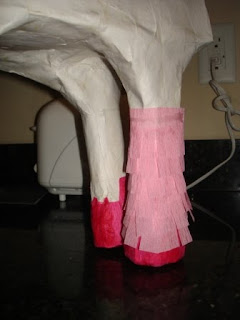
  5. Cut your streamer into managable lengths. Cut slits in the streamer (I stacked my streamers and cut several at a time). Clue the top edge of the streamer to the piñata and wrap it around the form. Layer your streamer strips until the entire piñata is covered.

  6. Add details (Face, Hair, etc.) For my unicorn's hair, I cut slits in the neck and slid the ribbons in then glued them in place.

  7. Cut holes in the figure and string a rope through (I had to use a hanger to get mine through). Voila! Now hopefully you have a beautiful piñata that has taken you days, and will be destroyed in minutes!