


This is the story of how I covered a crate that my Clementines came in. Once upon a time there was a beautiful mommy of 3 whose children loved Clementines. She let them take the out of the fridge when they asked her potiletly. There are a health snack and they could open them without help. How could she say now! When all the Clementines were gone (in about 1 day) she noticed an empty wooden crate in the fridge. While her husband made many pennies slaving away for the US Air Force, she just could take it upon herself to waste the useful crate by trashing it! But... it was pretty rough and had staples and... sadly, she didn't have any sand paper! Being resourceful she decided to help the lonely container by creating a colorful covering and finding new tenants to live inside it! And thus... the Crayon Crate Tutorial was born.
Ok... did you get all that? We are gunna cover this bad boy!

First you are gunna need 2 fat quarters of fabric and 2 pieces of batting the same size (or whatever size with drap nicely over whatever you are covering.)

As you can see the middle is a strange shape. So... I placed my crate in the center over my inside fabric and one piece of batting.

I used some fancy measuring tools to make a pattern for the corner. I just cut right along each inside part of the book right up to the crate.

The I cut away two lines at a 90 degree angle to the box. This took out some funny triangle shapes from the fabric.

From the top it is going to look like this.

It's hard to tell in the picture, but I pinned the batting to the fabric so that it would slip while I sewed it.

To start sewing I flipped the fabric like this....

To this... I am gunna sew that part on the right where the right sides of fabric are touching. I am going to do that on all the triangles.

Then I sorta do the same thing for the outside, but I don't need the odd strips for the inside.

For them I sewed of the edges again. It loose like this when done!

Next I made 2 handles by cuttings strips of fabric. One of the inside and outside each with 1 batting each. I cut these strips in half for 2 handles.

I layered them batting, then fabric right side up and then 1 fabric right side down. To sew a tube I just sewed up each side. The one on the left is inside out. The one on the right is flipped right side out!

Then I flipped my outside piece the correct way and pinned the handles to the outside like this. Then I stitched them down.

Then I took the inside and outside pieces and placed them inside each other with right sides toughing. I sewed around the edge, but... notice the gap in the front... This is where I will attempt to get the crate inside after I flip it the right way!

Whew... that was a pain cause... my whole wasn't big enough...

Last I adjusted the inside piece so it was down inside and hand stitched the opening closed!
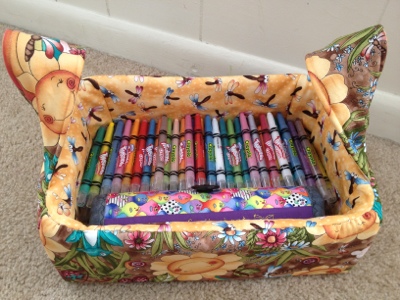
Tada! How long do you think those crayons are going to stay all perfectly lined up?
This is really cute!
ReplyDelete