Showing posts with label Sewing. Show all posts

Monday, December 28

Wonky 9 Patch Tutorial


I found this post buried deep in my draft posts from WAY back in June of 2012.
This is a tutorial for a Wonky 9 Patch.  It's a fun variation of a basic 9 patch...  There is a little more thinking involved so you still end up with squares, but... if I can explain this right it shouldn't be to hard!
At the end of May in 2012 we THOUGHT the military was moving us away from Florida so we took a big splurge and headed to Disney World for a whole week!
Part of our fun there was getting signatures and meeting all the different characters.  My kids were in heaven.  Instead of doing signature books I decided that signature quilts were the way to go!  
See that post HERE.
After the fun was over it was time to figure out creative cute ways to make awesome blankets!  The one below was for my son.  He is into outer space so the starry print was great for him!
All my original signature "squares" were 5x8 inches big.  I cut more out of other fabric I had purchased.This quilt is just a variation of a normal 9 patch.  I just couldn't get myself to do a normal one.  
For this quilt I was careful to place my signature squares in the corners.  Each original block is 9x9, just like a normal 9 patch.  Mine is extra wonky because I used rectangles instead of squares, but you could TOTALLY replicate this process with squares as well!
My original blocks are rather large so I only made 8 of them.  I then paired them off, making sure that the colors in each of the middle spaces were different within each pair.  Notice how the top middle and bottom middle in the top square are blue and the one below it has yellow.  The VERY middles are different colors as well as the left and right middle for each pair of squares.
I cut each pair together, laying one on top of the other with  right sides up for BOTH!  In a normal 9 patch you would cut right down the middle horizontally and vertically.  For a wonky 9 patch you place your ruler and cut like I have pictured above.  You start at the left of the top middle square and end at the right of the bottom middle square.
WITHOUT MOVING THE PIECES move your ruler to make the "horizontal" cut.  This time you will slice from the bottom corner of the left middle square to the top corner of the right middle square.
When you separate them out it should look like this!  Next comes the swapping!  If you notice my bottom left and top right signatures were upside down in the original square.  Here is where that gets fixed!  Since you are probably NOT making a signature quilt you won't have to worry about that step, but  still be sure to swap where I show you!
First that the bottom left of the bottom piece.
And swap it with the top right of the top piece.
The top right of the bottom piece...
is going to go the bottom left of the top piece.
After swapping sew the "vertical" pieces together first, then press!
Then sew those two pieces together on the "horizontal".  (Not sure why this whole picture is upside down.  I apparently uploaded it that way and I can't find the original on my computer!)
Do this sewing for both pieces.
After you have done this for all you pairs you can choose how to sew them all together for your finished quilt top!
(See if you can spot the difference between this picture and the one below.)
I bordered my quilt with scraps of leftover fabric.  I know I used HUGE blocks, but the concept is the same if you are doing smaller 4 inch squares.  Just sway where I showed you and you should be fine!
(Did you spot the difference?  HINT: I had to do some MAJOR unpicking to fix it.)

I will post pictures of the completed quilting when I can!  I just realized I don't have pictures of any of my kids completed Disney Quilts!  This was before I machine quilted myself and I sent them to my momma.  She was just learning at the time but did a FABULOUS JOB!  They deserve their own post!


Monday, December 21

Modern Half Square Triangle Baby Quilt

I just wanted to share with you a quilt I finished several months ago.  A while back my mom and I joined a fabric swap group.  Each month had a different theme.  I believe all these squares came from the flowers swap in the sprint time!  I personally LOVE scrappy quilts and usually choose them over patterned quilts with specific prints anyways.  I like finding ways to make fabrics that don't really match... match!
Here is a view of the top!  I actually saw something similar on Pinterest and I took a screen shot of it with my phone so I could go back to it while making the quilt.

I don't know WHY I didn't pin the thing!  Now I wish I had because I have loved this pattern and used it on at least 3-4 baby quilts since this one!  I LOVE this pattern!  Easy. Simple.  And ends up looking completely different depending on what fabric you use.  I love it.  Thank you to whoever came up with it first!

This quilt is special to me because it one of the first that I felt brave enough to custom free motion quilted on my machine!  It was fun to do different patterns besides just a plain ol' stitch in the ditch with my walking foot.  What IS interesting to see is that this quilt was made about 10 months ago.  I have quilted... to many quilts to count since this one and it's fun for me to see how I have grown free motion wise.
I LOVE the colors in this quilt!  I LOVE that it is almost vintage, but the pattern makes it a more modern quilt.
I was surprised at how well the quilting showed through even with the very fluffy back!  I like fluffy...  especially for a baby quilt.
Here is a cute stamp I had made so I could mark who made the gift!  I have several baby blankets people gave to me when my were born.  I have several that I can't remember who gave them to me!  With this baby I will defiantly have people sign their work.  Quilting is art people!

Friday, December 11

Simple Christmas Tree Garland

Our tree has a new Harry Potter theme this year.  I found a copy of Deathly Hallows at a thrift store for free that had cover that was pretty trashed.  I grabbed it to use the chapter pictures in some tiny frames we got to hang on the tree, but I didn't want to waste the rest of the book!

And this simple Christmas Tree Garland was born!

This garland would be simple and easy for any occasion, you just need the right color paper to match whatever theme you need.

To start I used a 1 inch paper punch to cut out a TON of circles from the scrap book paper.  I ended up having my daughter do this to save time!
And my sewing machine is in the shop, right before Christmas... that's a HUGE pain.  So, I used my daughter's sewing machine to create this. That just goes to show you don't need a fancy machine to create this as it only takes a simple straight stitch!
The only thing I recommend checking before you start is your stitch length.  Normally I sew with my stitch length around 2, but since you are sewing paper I would set this closer to a 3.  You don't want to many holes in the paper and have them tear in half as you sew!
Then I just lined up my circles and sewed them together in a row!  Not much to explain here..  I didn't even back stitch the first circle... Just sew away.
When one circles end gets close to the needle, slide the next circle under your foot!  This part helps to have a 6 year old handing you circles one by one...  IF anyone needs a technical cheat.  LOL
The row adds up faster than you would think!  Even with 1 inch circles I was amazed at how fast this went.
Another extremely secret helpful hint I shall reveal to you...
Use a fancy toilet paper roll to wrap your garland around as you sew.  That way they don't all get tangled and it is a little easier to drape around your tree when it comes time to decorate!
Garland should always go on the tree first right?  My 6 year old had to much fun helping make this so we had to put it on right away.  Here is a close up!
Looks pretty good in my opinion!  I am not to picky about exact ornament placement.  My garland draping probably will bother many people considering an 11 and a 6 year old did it.  I just stood back and said, "A little higher...  not so tight..."  Christmas spirit right?  Can't wait to put more ornaments on!  Funny... the rest of the house was decorated the day after Thanksgiving.  We wait a little for the tree because we like a fresh tree.  I just realized how close Christmas is!  We had better hurry!

Tuesday, September 3

Aurora's Animal Adventure

Good Morning Blogland!
Since it's been a while for consistent posts, I have plenty of oldies to share.  Right before we left Florida in April my baby girl was invited to a Birthday Party for a dear friend of hers.  Since we were busy packing and such I asked if we should just buy her something.  Aurora gave me a look of shock and replied, "Mommy, we ALWAYS make presents because then it is special and something no one else has.  It's more awesome that way."  

Duh... what was I thinking.  So I suggested a lap size iSpy Quilt.  I knew we could whip one out fast and Aurora had just finished one for herself a bit ago. I knew she could do most the work without supervision.  

Aurora says:
"No.  I was thinking... like a stuffed animal.  Like... an Elephant!" 
 The mother in me was thinking:
"Seriously...  I am sure that she has enough stuffed animals to create an army."  
The crafter in me was saying:
"Seriously, that sounds like something that requires time, a pattern, and tons of brain power and I will probably be doing most the work."  

Try as I might Aurora was insistent that we make a stuffed elephant.

THANK HEAVENS FOR PINTEREST!
The instant I saw these I knew I had hit the jackpot.  Something simple, that she could do mostly herself and using unique fabrics would make it one of a kind!

After getting the approval of Miss Aurora she promptly raided my fabric stash.  Guess it needed reorganizing anyway for the move right?

I cut out the pieces thinking she could just follow my orders and make the thing, but she wanted to be more hands on than that.  She had me show her right where to cut.  Soon the sewing turned complicated as she followed my inability to simply follow a pattern and started getting creative.  

"Mommy...  I want the trunk really long."
"Mommy... how about we sew a ling right here and then put stuffing in the ears around the edges."
"Mommy!  I want to put a purple bow around the tail!"
"Mommy.  I want the toenails to be small, so I will LET you sew that part because... I hate sewing circles."

Bwahahaha!

Needless to say I was shocked and amazed at her ability to change a pattern.  What was supposed to be a simple follow-my-instructions-and-this-will-go-sorta-quick turned into go-with-it-girly-you-are-on-a-roll!
Here is a picture of her sewing the top closed.  I thought that I should sew it closed because... hand-stitching a ladder stitch can be tricky.  Since it was on the top I THOUGHT it should look nice.  She about fainted when she saw be start the first two stiches.  LOL  

"Mommy!  Show me how to do it!"
Here is a close up of her ladder stitches.  My lesson has been learned.
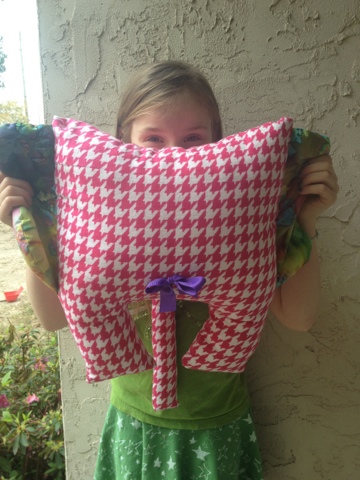
And here it is!  With fabric I didn't pick, with mismatching eyes because she wanted it that way, with small toenails, long nose, and fluff in the edges.
And the bow for a tail!
So, the only thing I was allowed to touch was the eyes.  She sewed the black buttons, I hot glued the green and blue middles.  I got to help stuff one of the ears.  I was deemed good enough to sew the toenails on.  LOL

It was very hard for me to let this thing go.  I want her to make me one now! 
Here is what I worked on while Aurora made the awesome elephant.  I put crinkle plastic in the feet.  It was a taggy for a friends baby shower!  Not as awesome as the elephant but... still cool.

Wednesday, April 3

Hello Kitty

Welcome to Whipped Up Wednesday!
Today I am sharing a few things that my daughter whipped up!

She is spoiled rotten and her grandma gave her this sewing machine for her 8th birthday.  Not only has her love of Hello Kitty appeared from nowhere, but her passion for sewing is out of control! 
Luckily grandma is super smart and also purchased some super cute little girly fat quarters for her to start some simple projects with!
Her birthday landed on a Sunday.  My grandma used to say, "A stitch sewn on Sunday is a stitch through your nose in heaven!"  But how could I tell her she couldn't play with her new toy right away! I have no problem sewing on Sunday.  To me it's not work it's fun.
So Aurora got set right to work.  I showed her how to lay out a pillow case and measure and in no time...
 she was sewing away!
Warning...  I am normally not a freak about washing fabric before sewing.  I do was after the project is done.  She was so excited to sleep with her new pillow case that we didn't wash it.  Yup... rash in the morning on her poor little face!  Went away in like 30 minutes, but still wash your fabrics before actual use.  Lesson learned!
To start her out learning we did lots of pillow cases.  When Grandma came to visit she showed of her skills to make pillow cases to take back to girly cousins whose birthdays were coming up!  I find it amazing how quickly she is learning to sew.
From there she made a bag for the headrest of the car.  She ended up making one for each of her brothers too.  I put on the buttons. and helped her line it up.  
Grandma would be so proud.  She asks to go to the fabric store all the time.  On our last trip she insisted that she needed a keeper for all her bobbins like me!  Funny girl.
On our last trip we went to Joann's Fabric to get something completely unsewing and fabric related, but I let her walk among the fabrics anyways.  She spotted a fluffy neon teal with black and hot pink cheetah spots and fell in love!  
"Oh mommy!  I need this!  I can sew that cute black and colorful fabric and make a quilt.  I would look so cute with this mommy.  Please, please?  I promise to sew right away when I get home!"
Now...  I am not a spender and have no problem saying NO to my kids for things in the store that we don't need, but...  She was way to cute! 
Above she is sewing the edging around her quilt.  She worked almost tirelessly until it was done.  And by this project I no longer need to sit right by her.  It was a little weird.  She understood my sewing directions and just went to town.  She came and got me when she needed something!
Here is her very first quilt all done!  She sat and helped me pin the top, batting and back together for over an hour!  I did the quilting on my sewing machine and I did the binding.  She sat and watched me the whole time to be sure I did it right.  LOL
See this face!  Remember it!  She just might be a famous seamstress one day!
I can't imagine what she will be sewing in year!