Showing posts with label Hair. Show all posts

Thursday, July 11

My Hair Turned Purple

Welcome to Thawed-Out Thursday!
This weeks post was WELL "thought" out.

This post is WAY past delayed but the story that happened after was hilarious so I had to share anyways.  Especially since... this hair cut has long since grown out and it's time for a new color!  I got this hair cut right before Easter!  Yikes. 
 
My little sister is a hairdresser and, as such, I usually get my hair cut and colored by her when I visit!  Last time I saw her was at Christmas.  My hair was due for a cut, but I didn't really want to bother her!  Christmas is fun and everytime she was over there just wasn't a great time to have a trim or a long sit in a chair.  Mostly...  She usually gets paid to do it and... I don't really pay her!  Love her yes... Pay... probably should.
Anyways since the last cut and color I had was in November at Thanksgiving I was WAY over due.  My beautiful Pink Ombre' had faded and my ends were... just yucky!  I thought I could wait until I saw my sister during our move, but... as our move keeps getting pushed back my hair keeps getting nappier and nappier!  (Is that a word. Ok... it is for now at least.)  I have a cousin who is a colorist, but I am not sure how long we would be in town or even WHEN! 

With the trusted help of Facebook I put a call out to all my friends to find a hairstylist in the area that was GOOD!  I was nervous and excited.  I love getting my hair done, but my sister is good.  And I have had some bad stylists.

I went in to Tiffany at Avant Garde Salon in Destin.  I asked for a purple Ombre'.  But she had a slightly different idea.  Fine with me.  I like different!
This is what she came up with.  Kinda hard to see with the hair down.  What I ended up with was pretty much some VERY heavy highlighting to the majority of the underside of my hair.  There are also about 5 spots just underneath the top where the color goes all the way to my roots!  Then she got really crazy and did some in my bangs too!  She used a very dark Purple and then something to make that same dark purple lights so that it blended a little better.
(The color looks a little weird in this picture.)
Here is some of my top layer moved back so you can see the underneath...  Lots of Dark Purple on this blonde!
This is a much better picture of just the color!  You can see the dark and then a good strip of the lighter purple in the middle!  I love it!  I also love that it the color almost seems...  Natural?  Well... as natural as purple blended highlights can be!  

And just in time for Easer! In fact, I taught the 3-4 year olds today in church.  One little girl noticed I had purple in my bangs and I decided to have fun with it.  (Just so you know... they call me Snow White instead of Sister Herbert because... it's fun.  I don't call any of them by their real names either.)
Belle: Snow White!  You have purple in your hair!
Me (shocked): What?  What do you mean?
Ariel: Right there!  Wait...  it's all over!
Me:  Wait...  You don't think the Easter Bunny did this to my while I was sleeping do you?
Belle:  I bet he did! But why?
Me:  I don't know.  He is a funny bunny.

I love kids!  And...  I LOVE my purple hair!  If we weren't moving I would totally go to Tiffany again! ;)

Saturday, December 15

My Pink Ombré


This post will soon be at the new site!

Wednesday, May 2

Mini Braids and a Side Pony

We are always on the look out for awesome swim hair.  Hope you enjoy this one!
I started with slightly wet hair so it would stay where I wanted.
Then I grabbed a chuck of hair from the front and braided it.  
When finishing it off with an elastic I grabbed a chunk of hair from the bottom and tied them together.
Then I picked another chunk from the front and again secured it in the back, but a few inches from the first one.
I did a third and secured all the hair in a side pony!
I think I will do 4 next time and start even further over!  It so easy and cute!


Saturday, March 10

Shamrock Hair Large

This is pretty much line the Tiny Shamrock Pony, but...  BIG!
Start with hair in a pony on the back that is slightly wet.
Divide the hair into 4 sections and put elastics about  halfway down on three!
Then we are going to do the same split and twist thing as on the Mini Shamrock Hair.
Remember...  split the mini pony.
Flip the tail end up into the split.
And loop it through as many times as you need this time!  I did it about 4 times.  
Remember doing this on the Tiny Shamrock?
This time I put each flipped pony up and...
Clipped it in place with a mini clip!  If I had all green I would have used them for the tutorial,  but...  Green didn't match her outfit that day and I didn't have green anyways!
I did that to all three mini ponytails and then secured the tail ends near the original pony with another elastic.
Then I covered the elastic with another mini clip!  See...  same thing as the Tiny Shamrock, but...   bigger!

Friday, March 9

Tiny Shamrock Hair Tutorial

Here is an easy Hairy Do for St. Patrick's Day!  We did this in a larger pony tail on the back, but... you could do an even smaller as a side half pony!
I started by putting most of slightly wet hair into pony on the back.  (Notice the little bit underneath that isn't in the pony...)
Then I seperated the hair in the pony into 4 sections.  Three mini ones got elastics placed about 2 inches away from the original elastic.  The rest of the pony hangs down to work with later!
Take each mini pony in turn and split the hair as pictured above.
Then flip the hanging hair up all the way through the spilt.
This will create 2 twists!  
After putting twists in all three minis you are going to pushed the mini elastic up so it is touching the main portion of hair and the hanging hair is... hanging down with the original pony.
Here are all three stacked.  When I pushed the up I sorta arranged them to create a shamrock!  Hold the 3 mini tails like so and...
Place and elastic around them as close to the original as possible!  If you need to rearrange the mini ponies here you can so they create a shamrock shape!
It's cute right!  I love the dimension!
Here is a close up view of the front.  I love how it pops up behind her head so it looks like we stuck a shamrock in her ponytail!


Friday, April 8

Dr. Seuss Pony-hawk

We are big fans of a mohawk in our home.  Aurora was especially excited to have a mohawk because... well.. BOTH of her little brothers have Faux Hawks!  When trying to come up with hair styles for Dr. Seuss week I happened to spy a picture of here with something similar to this from when she was about 2 flashing by on her daddy's laptop screen saver!  Talk about fate!  I remember doing that one when Sanjya  was on American Idol and got criticized for his.  I thought it was hilarious and put one on her!  So...  here is our updated version!
 We started with SUPER wet hair.

Tuesday, November 30

Headband Holding Hair

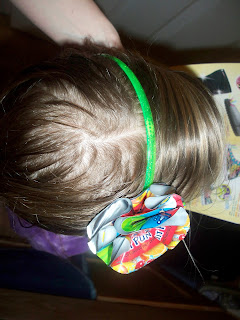
You may notice the headband from a previous post.  Here is a tutorial on how to make it!
My daughter loves headbands, but unless it is held down somehow she can't seem to stand them!  For some reason if I "fix her hair" she doesn't even think about it!  Silly girl!
I start by parting her hair in two places.  One long line parallel with her crown where the headband will lay.  The other on this part is where the flower is one the head band.  If your headband is plane then you can skip that little part!
Next, plop the headband down.
I then grab 2 pieces from the front part of the hair.  One from the left of the flower and one from the right.  I bring them under the flower, but over the headband.
Then I grab a small strand from the opposite side of the headband, right underneath the flower.  I twist, twist, twist the 3 sections together, just so they hold.  The clip is just there so I could take a picture.  Normally I just hold onto it with my hand so I can grab a little elastic.
I then put an elastic around the 3 twisted sections as close to the flower as I can get.  I kinda push it up a little so this one is hidden under the flower!  Do you recognize the headband yet?
Aurora has very fine hair and everything seems to fall out, so I put two more ponies in.  I just grab a section of hair from the front of the headband and then a smaller section from the opposite side.  I stick the 2 parts together with an elastic!
This is a very simple and quick way to get a headband down.  you could braid the front sections, or braid the 3 parts hanging down in the back... Be creative!  This is a fun way to spend time with your daughter!

Here is a tutorial for the Capri Sun Flower Headband again!

Thursday, November 25

Capri Sun Flower Headband

Funny Story First!

I was attempting to think of ways to make this post a little more Christmasy, because... 'tis Christmas Time! In doing so I was going call the post "Head" Ornament.  But... that gave me another totally cool Christmas idea, so... 
Here is a little Summer to keep you warm during the colder weather!
 I first cut the top part of the empty bags, opened them, cleaned them out, and set them out to dry.
 Then I used a small cup to trace circles on the bottom part.
 Cut out the circles.  One of them I cut slightly smaller than the rest, not by much though.
Get a needle and thread ready.  Flatten out your smaller circles.  These two will be your base.
 Your first layer will be all silver circles.  Start by folding one in half...
 Then in half again.  Place the point in the center of your base circle and stitch in down.
 Do all 4 silver circles.
 Tip: Make sure the folds are all facing the same directions.  Notice the double folded part is touching the single fold of the one next to it.
 Do the same thing with the colored ones.  I wanted the tips  of the petals to have those little cherries on them.   Be careful to fold the colored ones in the same places to create your pattern.   Unless.. you are going for that eclectic look!
 Stitch them all down... On this layer I had the folds facing the opposite direction AND I didn't layer them directly on top of the other triangles.  The center of each of these is lying over top where 2 bottom ones meet.
 Maybe this picture shows that last step a little better.  Also here I sewed a button to the middle!
I thought about covering the headband with a cute ribbon, but I LOVE the plastic raw materials look of the headband with the plastic drink bag flower!  Anyways...  Here is where we are going to attach them. It's pretty technical, so pay VERY close attention!   Pictured is the back of my flower, headband, and then a small circle scrap of the plastic bag.
FIRST  put a glue dot on the flower, THEN stick the headband where you want the flower touching, THEN squish the smaller circle on top.  

See... very technical.  If you mess it up I'm gunna be mad cause I gave you VERY good instructions!  lol  And yes.. feel free to call me a dork.
The last step would be to put it on!  Turned out pretty cute right!