Showing posts with label Recipes. Show all posts

Tuesday, April 2

Universal Studios Butterbeer Recipe

It's Tummy Tickled Tuesday Time!
Today I want to share with you a recipe for Butterbeer from Universal Studios!

Last year we went to Disney World as our last hurrah before moving... and then we didn't move.  So this year, when again we thought we were moving, we decided to hit Universal Studios for Harry Potter World!

I am a bit of a Harry nut.  I was so excited I could hardly stop to take pictures!  It was super cool, even if you aren't a Harry Fan.

The kids have just reached that age where they can really appreciate Harry Potter!  The three year old loves it cause...  Big Bro and Sis love it.  They cast spells on each other all the time!  "Eat Slugs" is a family favorite.  They love to make me vomit invisible slugs.

I am gunna say that we went at an absolutely perfect time.  February in Florida can be warm, but not hot and there is a slight chance of rain, but bring ponchos and you should be fine.   Harry Potter World was easily the most crowded portion of Universal Adventures Theme Park.  It seems that everyone was there.  And it is easy to see why!  But... still.  The longest line we waited in the whole time was The Forbidden Journey.  The sign said 30 minutes, but it didn't seem that long.  Perhaps it was because the line was constantly moving and 90% of that wait was inside Hogwarts Castle!  We do a rider swap cause we have a little one, but.... It was so cool we did it again!  (If you don't want to wait in line for this and aren't a die hard Harry fan...  do the Spiderman ride in the Marvel Hero section of the park.  It is similar and 3D AND it was my favorite simply because our 3 year old could ride it!)  The Forbidden Journey was a little scary for our very sensitive 6 year old boy.  He has a bit of an issue with Monsters.
We just happened to me some friends while we were there and we all headed to The Leaky Cauldron for lunch!  We all decided we could get ONE cool souvenir while at Universal.  And my hubby is a big butterscotch lover so...  He ended up buying Butterbeer after Butterbeer for his prize!  
They are pretty YUMMY!
He actually became a bit of a snob about them.  He swears the frozen ones INSIDE the Leaky Cauldron are more frozen and therefore more yummy than the ones at the little shops outside.  
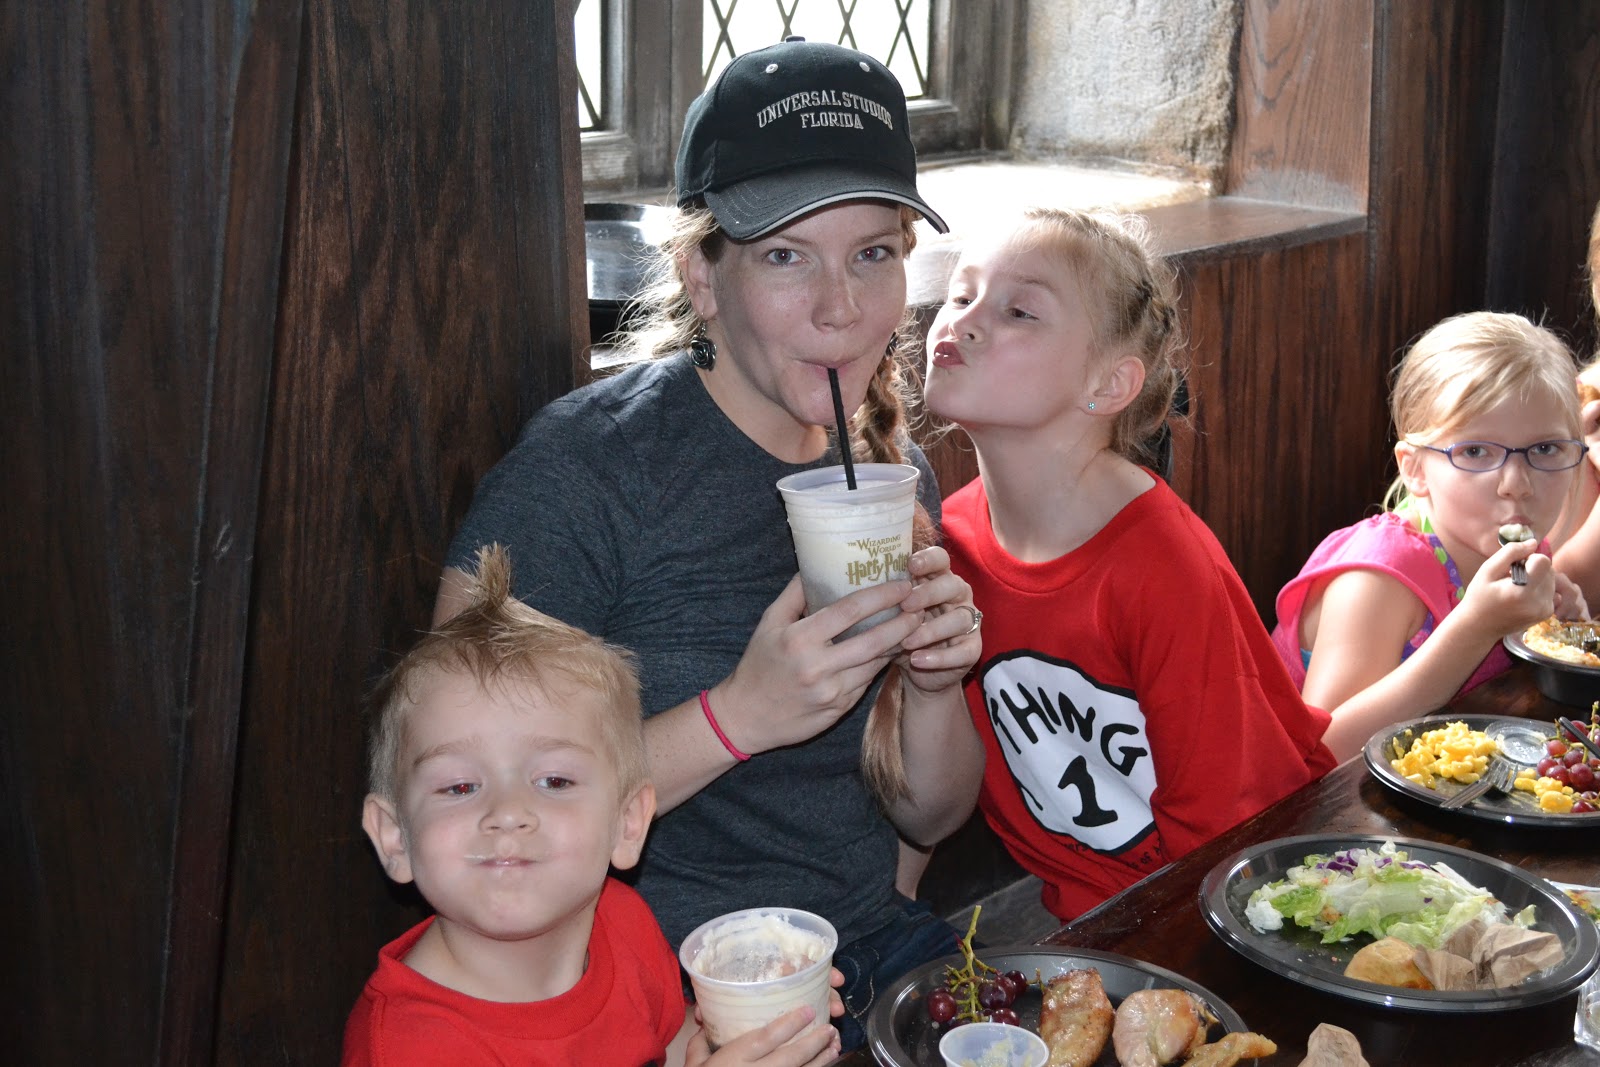
There are two different Butterbeers.  One is regular cold soda and the other is Frozen.  Just different textures.  Frozen was about a buck more.  The food was pretty good but the Butterbeer was something I could wait to try at home!

First I google searched and then Pinterest searched.  First, nothing I could find was really EXACTLY what I imagined the original recipe would be.  I have a Butterbeer Expert in the house so I  knew I had to get it just right!  And... I came pretty stinkin close if you ask me!  Second, every recipe I could find was for one serving or... had ice and you had to serve it right away.  Seriously, if you have had Butterbeer and like it you don't want one little serving!
So, after many trial and error recipes with the "expert", here is MY recipe for
Universal Studios Butterbeer!
Stuff You Need to Start
1 Big Bowl
2 2 Liter Bottles of Cream Soda
1 Jar of Butterscotch Topping
1 Tub of Cool Whip
The some Light Karo Syrup
and a little Rum Extract

First - The Frozen Butter Beer
In large bowl dump 1 bottle for Cream Soda and stir in about 1/2 - 3/4 Cup of Butterscotch Topping.
Stir that slowly till slightly blended and then place the whole bowl in the freezer.  I go back every half hour or so and stir it, just cause... then it's slightly easier to break it up at the end.  Plus...  I want to make sure it isn't magically done early so we can drink it!

Second - The Froth
Open up your tub of Cool Whip.
ADD 3 Tablespoons of Butterscotch Topping
2 Tablespoons Light Karo Syrup
1 Teaspoon Rum Extract
Then whip all that together until it's blended well, place the lid back on and stick it in the fridge to await your frozen Butterbeer.

Third - The Consumption of Yumminess
To serve you will want to chop up your froze stuff from the freezer and fill your cup lightly about 3/4 the way full with the slush.  Then pour some cream soda from the none frozen bottle, over the the stuff until your slush is at least covered.  I like the slush to be floating about and inch from the bottom.  Then plop a heavy spoonful of the Froth over the top.  It seems to expand a little as time goes by.

There!  A bulk recipe that can be froze and kept for a while and enjoyed at any meal or... just because it's yummy!  The only way I can get closer would be to go drink another and then try mine right away OR find the stingy person who created the one at Universal and won't share.  Believe me it asked.  But... take that!  Mine is pretty stinkin close!


Tuesday, September 25

Cookers Sand

Welcome to
Tummy Tickled Tuesday!
Where I share a fun recipe!

This weeks recipe is defiantly not edible but will tickle you tummy by way laughter to your ears! 

So my 3 year old grabs my hand and brings me in the kitchen.  Then he gets a chair and pulls it up to the counter so he could see and says, "Mommy!  Lets make something!"  After searching my parents house, we are visiting, for a cookie or cake mix I remember something my friend posted to Facebook.  We had so much fun that we had to share!  

This is technically knock off Moon Sand, but my baby kept calling it Cookers Sand!  I guess because he wanted to cook and it is made with mostly flour?
I must warn you that this is more of an outside fun.  Or inside with a large bin and a towel under you and... your house.    
Start by adding 7 cups of flour and 1/2 cup of baby oil to a bowl.  I had him do the counting and measuring so that tells you how strict this rule is!  We used a spoon to stir it up at the beginning then took it outside.

Next we mixed by hand!
Add more oil if it isn't wet enough.

A good test would be to make a ball and if it holds... DONE!

Yes... the boy is in his undies!  This is a lot like playing in actual sand and we didn't have a large tub to mess around in.  He had a ton of little toys that he would bury, then spin the bowl and then hunt for again!  Serious fun!  We did make a big mess, but most of it stayed in the bowl.

For storage we just kept it in the air tight bowl.  A week later and it is still pretty great!

Tuesday, September 11

Mrs. Simmon's Bread

Welcome to 
Tummy Tickled Tuesday!
Where I share some to make your tummy happy!

When I was a Senior in High School I had this boyfriend whose mom made the most delicious bread.  Seriously...  I gained 10 pounds dating this guy because of this bread!  When I got married she gave me the recipe to make for my own family!  To this day it is one of our favorite breads to eat.  In fact... I made it for our recent drive from Florida to Texas.  For a 11 hour drive it lasted about 1 hour AND we had just eaten.  It's just so yummy!

So now I introduce to you....

Mrs. Simmon's Bread!

IN A SMALL BOWL ADD
1/4 cup warm water
1 Pkg Fleishmann's Rapid Rise Yeast
1 tsp sugar
MIX GENTLY

IN A LARGE BOWL ADD
1 cup warm water
2 eggs
1/2 cup sugar
1/2 cup Wesson Vegetable Oil
1- 1 1/2 tsp salt
MIX WELL
add the yeast mixture
MIX WELL
add 4 1/4 cups of flour
STIR WELL
The dough will be pretty sticky.  Cover it would foil or was paper and let it rise for 8 hours." 
Preheat the over to 400.  Pour the flour out on a floured surface, add a little flour and for a ball.
Cut in half, and then each half into three.  
Roll and stretch into snake like strands.  Use the strands to create two braids for two loaves.
Bake at 400 for 12-14 minutes.  Butter the tops while hot and ENJOY!

I tried to get a good pic, but... after buttering mine and going to get the camera I came back to this!
Pretty yummy stuff huh baby!


Tuesday, August 28

Volcano Dino Dig Cake

Welcome to 
Tummy Tickled Tuesday!
Where I share a yummy recipe or cooking tip or... something food related at least!

My son turn 3 last month.  Yes... I know.  He is evil and rude.  All that growing.  I have tried to teach him not to, but... he just doesn't listen!  Anyways, I had a fun Spongebob Cake all figured out in my head and when I mentioned it to him he said, "I no want a Bob Bob Cake mommy.  I want a Dinosaur Cake."  Okay... Dinosaur cake it is!

So one day he was NOT wanting to sit on the toilet and poop.  He doesn't like to wait and I don't like it when he does so...  I sat on the edge of the tub and googled "Dinosaur Cake" pictures!
He saw TONS he liked! But... it was a spewing Lava Cake that caught his attention!  His other favorite cake had non-toxic dinosaur bone toys baked right into the cake! Way cool.  So I told him he would have to choose.

or

Imaginatively, he said, "Mommy.  You can make a Volcano WITH dinosaurs IN it.  You can mommy."
Duh... why hadn't I thought of that!
The cake itself was pretty simple.  Betty Crocker is my friend.  I made two 8 inch rounds for the base.  After layering my rounds I shoved these little guys...
Right into the cake! I didn't want to take the time to run around finding non-toxic toys that I could bake.  So I opted for toxic dollar store dinos that I simply washed! 
Then I cooked a box and a half in a glass bowl for the top!  After letting everything cool I spread chocolate frosting and Oreo crumbs on the whole thing!

Here is the part I wanted to share.  How I made the LAVA!!!
A cookies sheet covered with foil and heavily sprayed with no stick spray.
Then I lined up Life Savers and popped them into the oven for about 5 minutes on 350.
WATCH THEM!  Cause they get to this stage quickly.
WHILE THEY ARE IN THE OVEN carefully use a point thing to swirl the colors together a little bit.
THEN pull the sheet out and slice where needed as the cool with a knife so they will break apart where you want.
Some of them I carefully took out and draped over a bowl so they would cool in a curve!
(Do you like my Fancy Life Saver cooling holding tools?)
When everything is cooled put them on!
My mistake?  Using applesauce in place of the vegetable oil.  It makes the cake moist and yummy, but... with such a heavy tall cake...  Let just say that by the time we were ready to eat our Volcano had.. IMploded.  But...  Still looked alright.  Not fantastic but... A 3 year old doesn't care.  He really just wants cake!

Tuesday, July 31

My Daddy's Best Bulk Chicken

Welcome to 
Tummy Tickled Tuesday!
Where I share something yummy to tantalize your taste buds!

Today I would like to share
My Daddy's Best Bulk Chicken!

First off I should warn you how yummy my daddy's way of cooking this is.
The perfect way to do this is DEFIANTLY on the grill, but I know most of you would prefer to cook in you oven.    But I am currently grill-less so the oven way it is!
For the oven I start with FROZEN boneless, skinless chicken breast and place them on whatever cookie sheet they will fit on!
Then I coat them with Worcestershire Sauce.
Then I sprinkle well with Lawry's.
And pop them into for 45 minutes at 350 degrees or
until there is no pink in the middle when slice through the center with a knife.
Remove the chicken to a plate and pour the drippings into a cup to be used as broth for soup or... whatever you like to save your drippings for.
When you are done you should have perfectly juicy chicken!  You can eat it just this way OR wait for it to cool and put it in a Ziploc bag for later use!  It is seasoned just enough to eat OR to be re-seasoned when added to another recipe.

Now... you are going to have to wait to find out how to cook it on the grill!  It's yummy, yummy too!

Monday, July 30

10 Crock Pot Breakfast Meals

Welcome to
It's a Pinteresting Monday!
Every monday I feature ten interesting things I found through Pinterest.
This weeks theme is
Pinteresting Crock Pot Breakfasts!

So, due to crazy military life, ALL of our household items are in storage in South Dakota whist we are "temporarily" living in Florida.  Notice the quotes!  LOL  We are dealing, but there are VERY many things that I miss from my "stuff".  My crock pot is one of them!

While my hubby was working in the fire station he had a 24 hours shift and worked every other day.  So, every other day I created some sort of One Pot Meal to tote over there with the kids so that we could visit and sit down to eat as a family.  Usually, they were crock pot meals!  Two days ago we were playing at a friends house and I was complaining to said poor friend.  She then took pity on me and said, "My husband just got me a new bigger crock pot!  You are welcome to borrow my old one!" As I thanked her happily I was doing a tiny little gig in my head.  Oh the things I can now cook!

Although... perhaps I should just by her a new one.  Now that I have been without, I am sure to use hers every stinkin day!  She might get another new crock pot in a few months!

So, in honor of the wonderful borrowed crock pot I went diligently searching for some new ideas to try.  Since we will be homeschooling this year I decided to find some super cool breakfasts!  Just imagine starting breakfast before you go to bed.  When you wake up in the morning all you have to do is serve, cool and eat!  I will update the post as I actually try these.  I am so excited!!!
Apple Oatmeal by Sugar-Free Mom
Maple and Brown Sugar Oatmeal by Mel's Kitchen Cafe
Steel Cut Oatmeal by My Charming Kids
This is alot like the Maple and Brown Sugar recipe above it, but no maple and less sugar.
Blueberry Pancakes with Lemon by 365 Days of Crockpot
Regular Pancakes by Crockpot365
Breakfast Risotto by Crockpot365
Cinnabon Cinnamon Rolls by The Prudent Wife
This one actually takes 2.5 hours, so you can't leave it overnight.  But I would cook it at night, the hubby and I could sneak some for a midnight snack whilst the kiddos slept, then we could all eat it for breakfast!
French Toast by GetCrocked
Crock Pot Migas by Get Crocked
Served with Tortilla chips!
Yummy Casserole by Family Fresh Meals
Made with Hash Browns!

Okay... so that is actually 11, but I couldn't decided with ones to list! I even found a way to Boil Eggs with a crock pot! Check out the new Cravin' Crockpot Board on Pinterest for more.   They ALL sound so yummy I am drooling on the keyboard!  

Tuesday, July 24

Super Easy Pasta e Fagoli + Sausage

Welcome to the first ever
TUMMY TICKLED TUESDAY!
Where I try out a new recipe or cooking tip and share it with you!

I am the perfect Stay at Home Mommy. I make a perfect little grocery list and I always remember to bring it with me.  I prance around the grocery store happily placing tiny check marks next to each item as I lovingly toss it into my cart!  When I am done I have every ingredient I need for all of my perfectly planned meals for my perfectly organized family.  Aren't I perfect!

I suppose I would be if ANY of that were true!  Ha ha ha!  I do make a list but it seems, even then, certain things get left on the store shelves!  This past week daily swim lessons threw off my grove, but in a good way I suppose.  I planned a to have a yummy Pasta e Fagoli for my family one night.  We love Olive Garden and this is the "soup" my husband always orders as a side.  But... being cheap and never able to shell out Olive Garden cash, I found a recipe from AllRecipes.com.  Of course...  on the night set aside for Pasta e Fagoli I noticed I had somehow left out pretty much ALL of the ingredients from my list for this recipe!  

But I was determined!  I was able to find ingredients to sub in my pantry that almost perfect covered the thing I was supposed to buy! 
 Pasta e Fagoli + Sausage

  • 1 Jar Classico brand Spaghetti Sauce Italian Sausage Flavor (To sub for my lack of canned tomato sauce and spices.)
  • 1 Can French Onion Soup (For my lack of onions AND beef broth.  This soup is Beef Broth based.)
  • 1-2 Cups Ruffles Pasta (For my lack of ditalini pasta.)
  • 1 Can Garbanzo Beans (For my lack of cannellini beans.  I really would use cannellini beans though...)
  • 1 Package Italian ground Sausage (Not traditional, but my hubby likes MEAT so I knew he would enjoy the "beefing" up.)
Dump French onion + recommended water, the jar of spaghetti sauce and the beans into a large pot.  Cook for about 20 minutes.  Brown your sausage while waiting for that and chuck it in the pot when it's all done.
Then add you noodles and allows them to cook in the soup.  About 10-15 more minutes.  Add more water if it isn't "soupy" enough for ya!  There are enough spices in there that more water will not drown the taste!


Here it is done!  While far from the fancy recipes this turned our VERY good!  I think the only thing I would have done different was use the cannellini or at least some smaller sore of white bean.  The garbonzo's are kinda big...
I served it with some parmesean on top!  I made enough for lunch the next day, but... we all had seconds!  When all the kids want more you KNOW it's a recipe that will be repeated!

Wednesday, December 8

Get to Know You Bingo {With STRAWBERRY Ice Cream}

Ok.. You would think that after being a Primary President NOTHING would scare you, but I admit, I was totally nervous about my first night.

When thinking of what to do, I remembered seeing this post around blog land.  I decided to do my own variation of that.  Who can't love someone who lets them eat Ice Cream!  Even if you are forced to make it yourself.  But first... the activity!

Thursday, October 14

Haunted Candy Houses

My husband's family had a tradition growing up where they would decorate REAL gingerbread houses at Christmas time.  I haven't gotten good enough to bake REAL gingerbread yet, but... we also decorate Haunted Houses at Halloween!  It is different, fun, and we give away the leftover candy on Halloween!

All you will need is Chocolate Graham Crackers, Halloween Candy, and my Edible Frosting!  The chocolate graham crackers are harder to find than you would think.  Some of them come with giant sugar crystals all over.  They taste good, but it's harder to get the candy to stick to them!  To save on candy we have added chocolate chips and other cookies than don't really go with the theme.  We have discovered that if you have the chocolate crackers and the orange frosting it turns out Halloweeny.

Jessica's Edible Mortar Frosting

1 Cup Shortening
7 Cups Powdered Sugar
2 Tsp Vanilla
6-7 Tbl Hot Water
Food Coloring

I mix it all up and put it into gigantic Ziploc Freezer bags.
I then just cut a tiny corner to pipe onto the houses.

I generally put the houses together the night before so that they dry.  Then the kids tell me where they want to stick the candy and I squirt the frosting there!  They have turned out amazing every year!  This year we invitied friends!  The more the merrier...  or... scarier, since it's Halloween!   Here are some pictures closer up of the plain house, so you can get an idea of how I put it together, and some with candy on them!


Wednesday, July 7

"Squishy" Noodles

I guess the title can sound kinda gross, but these are truely a new fav at our house!  They are thanks to Melly Hotz!  We went to her house and she made some for us!  She made them for her kids when they were little.  They were an adventure getting started.  It had been a while since she made them.  But they are a HIT with my kids!  Even here on vacation the kids are asking for them!  Half cause they are yummy, half cause they are fun!

Note:  If you like... add ingredients to a hefty gallon bag and have you kids smoosh it instead of mixing!

Start by boiling some water!  Sprinkle it with salt if you like!
Next... in a separate bowl from your water of course... lol...  Beat 2 eggs.
Next you are going to add in (about) 1 1/8 Cup Flour, 3/4 Cup Milk, and 1/2 Tsp Salt.
My mixer is going here, so this looks a little thick, but... slightly less thick than this is the consitency that you are looking for.
For this next part you will need a helper to hold open a plastic bag while you scoop it in there!
Just for fun this time we added some blue food coloring.  (Plus... I knew it would make it easier for you too see the noodles in the picture!  lol)
I let the kids moosh it around like play dough.  If you were going to mix it in the bag.... this is where you would start!  It does save you the hazardous step of attempting to pour the sticky dough into a bag.
By this point you water should be at a good boil.  Cut a corner off your bag.  Not to big... not to small.  You noodle will be about that size in width.
Now slowly, but not to slowly... squeeze about half a cup of batter or so into you boiling water.
The noodles will float to the top when they are done!
Next fish them out with a giant spoon with holes in it so the water drains out!  Sometimes the noodles will stick a little to the bottom.  When you fish out the tops ones the bottom ones will knock themselves loose a little and you can get them!
See!  So neat right!
I just set them onto a cookie sheet in a pile while I'm digging out the rest this time.  We ate them this day with just butter and parmesean.  If you want to use them in spaghetti then just place them in a bowl with butter so they don't stick to bad!
These are technically called "Spaetzle"  But... since we squish them out of a bag... that is what my kids call them!  They do make special tools that you can squish the noodles through into the water, but... I like less dishes!  I don't know about you!


Visit thecsiproject.com