


Now... you could do this with ribbon, but.... you would have to work harder to get the pattern even (if you are crazy like me...) Plus it would probably cost a little more AND you would need more! So.... I used fabric! You are going to want one continuous length of fabric. I cut mine into 1 inch width. The simple way to explain the cutting is to do it with scissors and just make sure you are semi-even and it's one continuous strip of fabric.
I used a rotary cutter and a quilting mat. Easier and quicker for my, but a pain to explain. Notice that one end of my fabric is scooched up a little. When cutting my strips I started 1 inch in and cut only up to the shorter one. After the first cut I cut in 2 inches.

I then took the 2 inch strips and scooched up the shorter part so that it was over the longer part! I then cut them with my rotary so that they were 1 inch strips! See... did you get it? Cause I did it, but the discriptions got ME confused! Just use scissors and cut it into a long strip!


So... however you got here... you have a long strip of ribbon or fabric and about 10 hair ties! I wanted enough to make it stay, but I didn't want it to be so tight that there weren't circles on your head when you wore it.


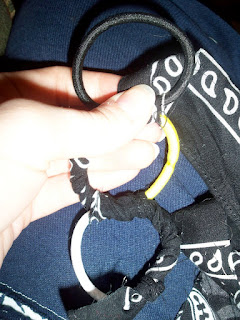
Tye one end to a hair tie.


Wrap, Wrap, wrap, until you are about halfway.


Then grab another hair tie and wrap the 2 hair ties together about to times. Then wrap, wrap, wrap around the next hair tie until you are about halfway!


Then you add another! Notice how I wrapped the right and then the left on the next and the right on the next... I'm not sure this is totally necessary, but I figured it would make the wrapping more interesting cause... it takes a while and can get boring! LOL

When you are done with all 10 they kinda make a cool spooingie thingy. I think it cause of how I wrapped them, but when you finish it goes away and makes a pretty circle.


To finish you connect the last loop with the first and wrap the side you didn't wrap the first time around. It should fix the spooinginess.


At the end just tie it in a knot to hold it still.


I wrapped the extra fabric around my fingers like so.


And tied then wrapped a little more around the middle AND the headband to secure it. You can leave it like this if you like a bow. OR seperate the loops and it makes a shabby flower!


Here is one I made with a GIGANTIC flower.


Here is a side view. We LOVE these. I could make them slightly bigger so that they aren't tight on her head. We have had headband issues and she always complains about them. This one actually stayed on ALLLL day!


No comments:
Post a Comment