Monday, April 30

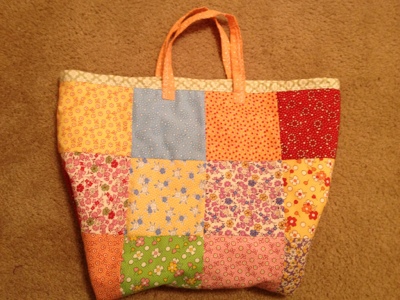
Laundry Trash Cover

I started this bag with big ideas.  In my laundry room is a plastic bag that hangs on a knob and serves as trash collector for lint and dryer sheets.  I have had a plastic bag in every home we have lived.  When it fills I chuck the whole bag.  So, my idea here was to make a plastic bag cover to match The Lonely Sock Bag.  It didn't end up quite how I wanted, but it serves it's purpose!  Also...  in hinds sight, there is a MUCH easier way to do this!
Since I was making a trash bag cover I decided to use an actual trash bag as a pattern.  I cut open the bag and laid it flat.  
I used this to measure 2 pieces of fabric for the outside of the bag, 2 for the inside and 2 pieces of batting.   Notice I only cut them square.  I didn't use the handle portion of the bag.  I guess I could have, but...  I didn't!  The handles on the original bag folded several times and I didn't want to do all that folding and pinning and have bulky handles. 
Next I took my 2 outside fabrics and laid them right sides facing and sandwiched them between 2 pieces of batting.  Then I sewed up the to outer edges, leaving the top and bottom open.
I did the same with the inner fabric, only minus the batting.  I sewed up the 2 outside edges, leaving the top and bottom open.  I then left the all wrong sides out and laid the inner fabric on top of my batting/outside fabric combo.
Next I got a bag that was still sealed on the bottom and placed it center on my fabric.  The I grabbed both layers of fabric and folded up one side a little less than the fold of the bag and pinned on the bottom.
I did the same on the other side only this time I flipped it under.  I don't thing this really matters only...  I think I would have flipped them the same next time cause...  It doesn't really matter!
Anyways...  then sew along the bottom edge.
Next I flipped it right side out by grabbing the inside layer and one outer layer and...  flipping them!
See...  flipped and funky shaped!
Next I pinned some matching binding along the top seams with right sides touching and stitched along the top seam.
After folding it up and over to the other side I pinned and stitched it down with a decorative stitch!
I used the same decorative stitch to make some handles. I wish I had lined these with batting...  oops.  they r just fabric folded over a couple of times.
I made sure they were the same length as the plastic bag handles before stitching them in place.
Here it is done... the first time! It is cute... and it works, but it didn't quite turn out how I was thinking.
See...  I even took a cute finishing photo.  But...  it just didn't seem quite how I wanted it.  But I went through all that work and it took me 2 months of staring at it to figure out exactly what to do to fix it in my mind!
I took some elastic and placed it between the outside edges of the bag.  Stretching the elastic as I sewed it down made the edges ruffle a bit when I let go.
See!  Edges ruffled and cinched in a bit did it for me.

Saturday, April 28

Printable Daily Schedule

I while ago I decided to become more organized about my day!  I started with a meal planner I found through Pinterest on Ollibird.  Then I made a Home Cleaning Schedule to match.  Next came this Daily Scheme!

I came up with this after looking around on Pinterest for a while.  There are so many out there, but I just knew what I wanted!  Hopefully this will work for your day too!
I have a spot for dates I need to remember.  A place for a running list of To-Do's or things I want to make.  I decided I needed a place to have one daily goal!  I also created a shopping list spot that is the perfect size for a post-it note for mobile goodness!  I have been really good at keeping up on my workouts and staying healthy.  I have found that if I drink water I snack less so...  a spot for my 8 glasses of water and my workout are on my chart too!  Now...  if this isn't for you... then do 5 crunches and count that as your work out!  LOL  The point is to do SOMETHING active during the day.

I spray painted a frame and glue magnets to the back so it would fit on the fridge like the rest of my lists! I like lists.
CLICK HERE to print this chart horizontally.
CLICK HERE to print it perpendicular!
I actually made it perpendicular first then realized it wouldn't fit on my fridge that direction so...  lucky you to have your pick!
I wish I had thought about where my magnets were placed.  This one hangs up the top of the fridge because the...  brand plate thing... was in the way!  Rgg..

They all look nice together right?

Thursday, April 26

Printable Home Cleaning Schedule

While I am fairly good at keeping up with my home cleaning.  I have been longing at finding a better way to be organized about my whole day.  Meal planning, cleaning, just my day in general.

My first order of business was to scour Pinterest.  I found lots I liked, but none I loved.  I think the problem is that everyone has a different house and everyone has a different schedule and everyone is..  DIFFERENT!  So I came up with my own thing that I am sure won't work for you because you are different!  I did find THIS meal planning printable from Ollibird I thought was SO cute!  So...  my printable is going to match it!

I did do a few things to hopefully make the schedule easier for everyone to use.
  My first plan was to get the kids chore charts going, but...  I figured I should make myself one first!  Then I can figure out ore easily what they should do and they can see that they aren't the only ones who have chores!   So first on the home organizing list was The Home Cleaning Schedule.  Here are a few tips on how to get my chart to work for you.

How To Make a Home Cleaning Schedule

1. Start by listing all the things you regularly clean in your house.  Yeah...  It can get pretty long.

2. Next try to organize your chores into 3 different groups.  Daily- chores you need to do everyday.  Weekly- chores you do once or twice a week.  Monthly- Chores that don't need doing as often, but still need to get done.

3. Next you can put the Daily chores into Morning and Evening ones.

4. Then sort the Weekly chores by day of the week!

5. Print out the chart I created and write out your schedule!

Below is a pic of what I came up with for my Schedule.
CLICK HERE to download the printable I made for me.
CLICK HERE for a blank one to customize for yourself!
To display mine I spray painted a thrift store frame and used E-5000 glue to stick magnets on the back!  I did the same with the meal planner.
See...  they all look nice together don't they!

Are you wondering what the top left on is?  Don't worry you will get it tomorrow!  I am having issues saving the PFD.  But I will get it!

Tuesday, April 24

Fall Leaves Sisters Quilt

Back in September and October of LAST YEAR my mom, my sister and 3 of my Aunts did something fun!  My mom had found this pattern for a Fall Leave Quilt Square.  I love the look of scrappy quilts so we decided to trade!  Each of us made 6 of 3 different blocks and then we swapped!  I just wanted to share how pretty it turned out!  Sure... it's summer and it took me that long to finish, but...  Look how pretty!
Here is a full shot of the front.  All the squares were 12 x 12.  It fits just barely on top of my queen size bed without going over the edges.  I would have liked it bigger, but...  those leaves were a pain in the butt!
I machine quilted the squares individually.  That one in the middle is my first attempt at free motion!  I did ok if you ask me!  All the others I used a fancy stitch around the leave shape.  I used a darker colored thread so that it would show on the light flannel background!
My mom embroidered this square to add to the quilt!  Cute right?  It's the one I free motioned cause it was different from all the others.
We all have fancy machines so we stitched our names on the stems!  This quilt is all us!
The pattern we used for the blocks is linked HERE!  Great pattern.  Super fun time.

Thank you Aunties, Mommy and Sissy!  Fun project.  Maybe now that it is summer I will do a Christmas Quilt...  LOL

Monday, April 23

Spring Jelly Roll Skirt

This skirt was so easy to make that...  I am totally about to make her another one!  She is very much a girly girly, although...  she LOVES getting dirty and will pick up lizards before her brothers do.  We had to create rules about how to act in a skirt!  Ha ha ha!

What is a Jelly Roll?  In the quilting world it's the term used for a pack of 40 different strips of fabric, each measuring 2 1/2'' by the width of the fabric.  They are all "rolled" together and tied.  They are fun to use if you like a scrappy looking quilt.  You can use them for binding or...  This Spring Jelly Roll Skirt!
To start I picked out 11 different strips.  They are 4 times longer, but just folded up so it was easier for me to switch around their order.
To start I simply started sewing ALL the strips together!  It shouldn't take you to long.  The pic above they are sewn and the whole thing is folded in half.   When you fold it in half you are going to have some strips that are longer than others.  Square it all up AND cut along your fold so that you have two pieces.  
Next flip one of your pieces different colored strips are touching.  Sew the sides to create a big circle!
The next part was to easy I forgot to take pictures!  I hemmed the bottom.  The I folded over the top about 2 inches and then again about 4 and sewed to create an elastic casing.  Above is it pictured WITH the elastic.
Last I added made a bow out of the pieces I had cut off.  It is really just a loop with a blue scrap square sewn over the middle to keep it looped and in place!
She was so excited!  I tried to get her to wear it a little higher, but... it is her skirt!  So...  she will wear it how she pleases!
She ahs to much fun being my model.
Yep...  she had to wear it to school the next day!

Sunday, April 22

Tights to Ruffled Socks Tutorial

Recently my daughter found these tights and wanted to wear them, but... they are defiantly to small for her.  She had gotten tall lately!  But... the feet fit her ok so I came up with this idea.
I laid them flat and snipped off the feet above the knees.
Then I Zig Zagged the edges and sort of stretched the sock as I fed it through.  I went around twice to secure it and to make sure you could see the cute green thread a little better.
See... it ruffles the top down!
Here they are done and on her!  Without the waist part the slouch A TON more than usual, but...  now the are socks so they don't have to stay up!

Saturday, April 21

Sidewalk Spelling Game

We have been thinking of tons of ways for my daughter to practice spelling.  She seems to have a huge amount of homework for a First Grader...  Anyways...  Spelling...
I used some sidewalk chalk and wrote her words on the path leading to our door.  We walk to school and back home everyday so she reads them on her way to put her bike back!  It has been getting warm out so while she had her brother snack on popsicles we play a game!

I shout out a work and she runs to it!  After doing that a couple times she has a turn, but instead of shouting out the word she spells it and me and her brothers run to it.
See!  Look how happy they are AND the are practicing spelling!  YEAH for happy homework!

Friday, April 20

Spring Chickens and Tie Dye Cupcakes!

I love it when I remember ahead of time that I need to make a treat for my primary class!  I had been thinking all morning of what I could make when my sister texted me a picture of her cute cupcakes she was making.  So...  I copied her!  But...  I had to add a twist of course.
I started by making regular cupcake batter from a box mix.  I like to create things from baking and it takes enough time to do all that!  Then I divided the batter into 4 bowls (yes I know only 3 are shown...  and 2 of those have no batter!  I didn't think to take a pic until most the batter was gone!)  Then I used my fancy wilton food coloring to mix up the colors.
I placed about 1 tbls of each color batter into a muffin paper.  Notice I didn't even put the papers into the muffin tin yet?  That is because I did and then it took so long I didn't want to have to fill them in between oven switch them!  So...  at this point my first batch is in and I am filling papers ahead to save time.
I used my lightest 4th color on top.  I knew I was going to frost them all yellow and I didn't want the cupcake color to bleed through.  
Then I used the end of a spoon and gave them a swirl to mix the colors!
As you can see some of the color pops through anyways, but look how fun so far!
You probably also notice that my cupcakes are pretty tall.  That is how I like them!  No flat cupcakes for me.  I like them heaping!
Here is a pic of the done frosting.  Again...  I didn't use homemade frosting, just the butter-cream from a can.  It's what my hubby likes most anyways! To start I colored my frosting pale yellow for the base.  Then I tinted it again darker and shoved some in a ziploc bag.  I snipped the corner and used it for piping heart shaped wings.  Then I squeezed the remainder out and colored it a dark more orangish yellow and piped the triangle nose and feet!  The eyes are upside down chocolate chips with a tiny dot of butter-cream again, piped from my fancy Ziploc bag.
My hubby's primary class is rather large and he gives them each 2 treats.  One for reading a scripture during class and the other for behaving!  So he likes to have his treats hidden from most of the world as he walks the halls in church.  It's easy to get mobbed when armed with yummy goodies!  So here are his in a box where they happened to fit perfectly.  
Even I didn't realize my own cleverness until I closed the box I had put his cupcakes in!  That was funny.  "Brother Herbert brought us eggs as a treat? LAME!"  Then they open it. "Holy Smokes they hatched!"  LOL
I didn't want my kids to eat their treat until they got home cause mine are younger and much more apt to make a mess!  So I put some easter grass in a Ziploc and shoved a cupcake in.  (I took this picture at an angle apparently because the pic looked wrong both this way and perpendicular...  Rgg...)  

All the kids loved them!