We have known that we were moving for a while and Aurora's teacher magically planned for her to have the treat on her last day. So my mind wracked up many different ideas for treats for my daughters class. I wish we didn't have to be moving to use them all! Rgg...
So... after many discussions with Aurora on what she would like to bring as the actual treat and keeping in mind that we would be starting home schooling for the rest of the year we decided on the perfect inspiration. Mail! Aurora's class does a daily journal, which we will of course be continuing, but... every now and then we will mail letters to her class! I bought a cardboard mailbox with a coupon at Hobby Lobby and let her decorate it. I wish I had taken a picture, but I have moving madness. It was very Hannah Montana glitter meets Franklin the turtle stickers. We stuffed it full of envelopes and paper so her class could write to her. I showed her how the flag on the side worked so that she could explain it to her class. Then I purchased several Twinkies (technically "White Clouds" cause... they were cheaper.)


Thursday, March 31
Thursday, March 24
Primary Teacher Coupon
When serving in the Primary Presidency it was hard to find gifts that all the teachers would love and were cheap! LOL Food is always a big hit, but I wanted to find something that would let them know that we REALLY did appreciate the work they do for the kids.
CLICK HERE for the file to download.
I just cut them out with cool scissors and tied them to a candy bar. (Because who can say no to chocolate!)
Monday, March 21
Cheerleader Skirt (Easy)
Aurora recently decided she HAD to take the cheerleading class the high school offered to the the elementary schools. It was an easy fundraiser for 10 bucks. For about 2 hours after school one day they taught the little girls 2 cheers and a dance. Then the next day they performed at the half time of a JV Basketball Game. Aurora was SOOOO excited! Until I forgot about the day of the practice and showed up at the school to pick her up. Then she had a breakdown and wanted me to stay. I had to use my sneaky spy skills to get her to stay and let me sneak out with the boys. Ooops.


Anyway, one of the things that helped her to stay without me was remembering about the skirt I had made her back home! She was so excited to wear it!It was pretty simple to make, but... I made it VERY late at night with my little one sick on my lap, so... if the pictures aren't the best... get over it! You didn't stay up all night with a booger baby making it! LOL

To start I cut several strips of fabric from a t-shirt and some dark blue leggings I had in my make-over/giveaway pile. It's a little hard to tell, but I kept the bottom hem of the shirt and pants at the bottom of each strip. That way I wouldn't have to hem! I also cut a 5 inch wide strip that was the same width around as her waist, plus about 2 inches.

Then I sewed all the strips together in a contrasting pattern. (See all the DONE hems at the bottom!!)
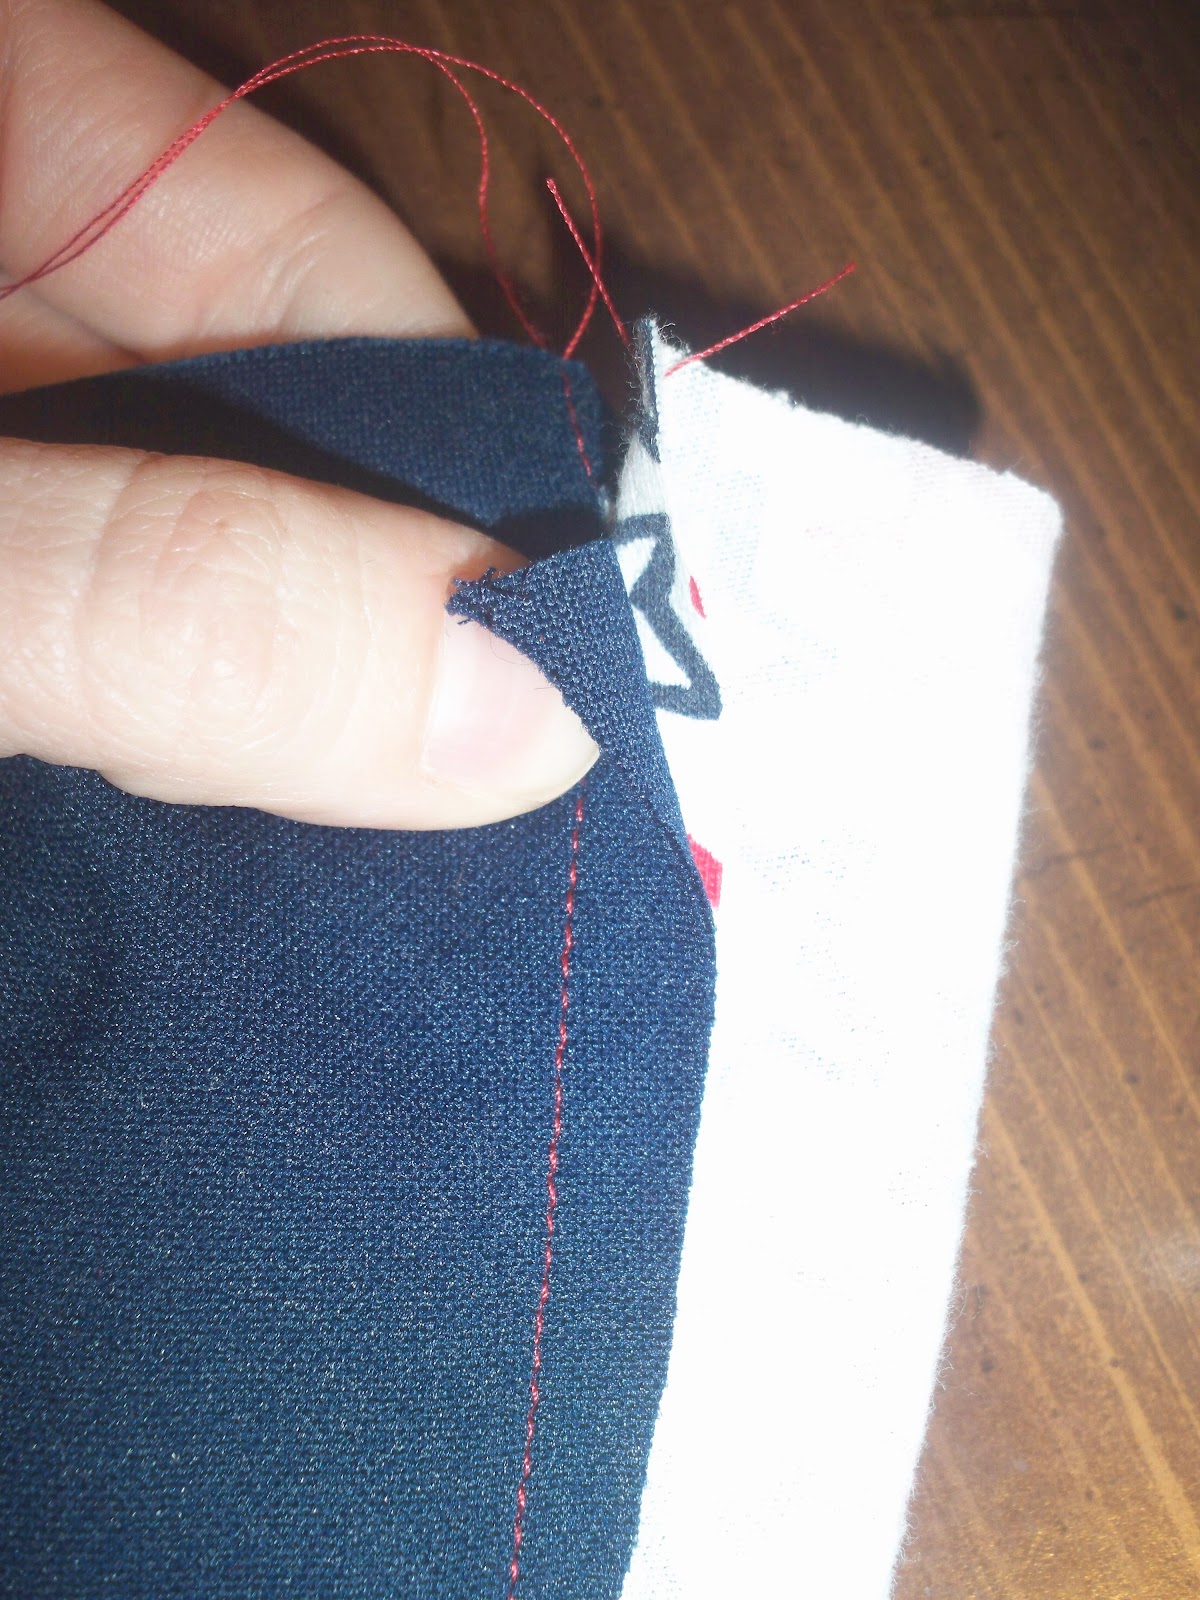
This part is tricky to explain, but the skirt is inside out. I then too the right sides of two dark blue strips close to each other and matched up the seams so that the star fabric between the was folded in half. The I sewed a simple straight stitch over the seam so that when you opened it up the 2 blues were touching and the star was behind.

After doing that to ALL the star strips. I took the MIDDLE of the star strip that was in the back and matched it up the where I had just stitched the 2 blues together. Then I pinned the sides of the star fabric in the back so they would lay flat against the blue.

I then flipped the skirt right side out. I took my piece that was 5 inches and sewed the ends together to form a circle. I folded it in half and pinned the raw edges to meet up with the raw edge at the top of the skirt. I carefully took the pins that were holding the star strips and just hooked the blue around it to form a casing for the waistband.

I ended up threading a silver shoelace through to help keep it up!

She was so excited to wear it that friday! Easy Cheesy and CUTE!
Total Cost: FREE
I used ALL things that were slightly worn or didn't fit. I love up cycling clothing!

Total Cost: FREE
I used ALL things that were slightly worn or didn't fit. I love up cycling clothing!
Saturday, March 19
My Favorite Fabric Ball Patterns
I have discovered a new way to use my tinier fabric scraps! Making Fabric balls!!! It's great! the pieces that are larger can be used to make the ball and the rest well...


I NEVER throw away fabric! Even tiny pieces like this!

I simply shred the smaller and...

Shove them into a fabric ball!
 Stitch it closed!

Pictured above is a more complicated pattern for a 5 inch ball. They take alot longer to finish than you would think. I guess it just depends on how often you are sewing and have scraps! I now keep a ball like this near my sewing machine.
My one year old LOVES these! He can chuck it anywhere and it doesn't hurt! I figure I can keep them to give as gifts or just... keep them! You can never have enough soft objects to throw at your children right? LOL Ok... that sounded bad, but.. they throw it at me too! It's self defense!
My one year old LOVES these! He can chuck it anywhere and it doesn't hurt! I figure I can keep them to give as gifts or just... keep them! You can never have enough soft objects to throw at your children right? LOL Ok... that sounded bad, but.. they throw it at me too! It's self defense!
Here are a few links I found for some great ball patterns. Hope you enjoy!
The Internet Juggling Database - 2 Downloadable Pattern Packets (Instructions aren't the best, but it's the best collection BY FAR!)
Princess of Chaos - 4 Piece Square Ball Tutorial
The Purl Bee - 6 Piece Fabric Beach Ball Tutorial/ Pattern
Kathy Haynie - I have seen ornaments and balls like this, but THIS was the best Pattern and Tutorial I found.
Knitty Gritty Thoughts - NOT a throwing ball, but this Styrofoam Pinecone Ball is so cute!
Sunday, March 13
Texas Flag Purse Hanger
I actually created as a Christmas gift. I, of course couldn't post it then! LOL
My little sister is graduating the end of the school year and is headed or college. As such, she has decided she needs more TX things in case she leaves the state. She hasn't decided where she will go, but... still. A Texas girls needs some Texas things right?
I saw a post on A Girl and A Gluegun about a purse holder like this and thought I would post my version. I really did just what she did, but... with a Texas Twist.

I started with a flag, some batting, and a random scrap board

I cut the batting to size. Then I used Gorilla Glue and clips to hold it till dry... This was more to give sharp particle board a softer feel.

I cut the flag to size.

Then I sewed up the side.

I put it over the board and hand stitched it closed.

I bought some simple hooks to put on it. I wanted to find some awesome horseshoe hooks to put on it, but.... those had to wait. The shipping was gunna take to long! And... I couldn't find a price I liked.
Total Price: 10.00?
These hooks were about 2.00 for the pack, but I want to get cast iron hooks eventually. Those are around 10 bucks. Pricey but the will look neat!
Thursday, March 10
When You Serve Our Dear Savior
Here is another song written for my little brother who is on a mission for our church. Truely this song was written for him. The lines about the family are... ACTUALLY about our family. He loves to tease us sisters (He poked my tummy 1 week after I had my third baby and said, "Wow... you are still fat!" Evil...) My mom is not a pet person PERIOD and he has a beloved, and slightly insane, cat he left behind. I think she may actually be part dog. His signature meal is a Sausage Pizza from Shwanz. He loves his family and is a VERY good brother. He has made great plans for his future, but has been was WAY ready to leave and go on his mission for a while. Anyways... enjoy the song!
It is sung to the tune and music of "Once Upon a December" from the movie Anastasia. I DID NOT write the tune, music or any of that stuff that could make me get sued. LOL I simple wrote the lyrics and sang along like Karaoke!
It is sung to the tune and music of "Once Upon a December" from the movie Anastasia. I DID NOT write the tune, music or any of that stuff that could make me get sued. LOL I simple wrote the lyrics and sang along like Karaoke!
Here is a link to download the lyrics to "When you Serve Our Dear Savior".
(The link will take you to an external site. Scroll down from there and the button to download is BELOW. It only has a certain number of downloads so... PLEASE email me if it doesn't work!)
Also, please remember this is simply meant to be a fun song written for my brother. It is NOT an amazing recording with WOW vocals. I didn't even create the music, but... I can sing in the shower pretty well and I love making silly songs for my little bro!
Thursday, March 3
Horton Hears A Who Cupcake
Ok... I searched all over the web for an easy Horton Cupcake and couldn't find one I liked, so... I had to create my own! I'm not the best at pastry decorating, so I think they turned out pretty cute! I will warn you though... I had to finish VERY FAST! I realized I was out of time, so the ears could have been done much better if you ask me! And... since you are reading this... you are! And I say they could have been done better! LOL They tasted GREAT!
Also... my camera TOTALLY died so I had to use my crappy camera that is pretty much broken. I took about 100 pictures to get these few! Rgg... New camera... Here I COME!

This is the stuff I got to make them. I used the Almonettes because they were slightly larger than Milano's and they were on sale! The little bottle with the red lid is candy pearls.

Bake your cupcakes and cool as needed. I put ALMOST all the white frosting into a bowl a light purple. I was going to do them gray, but... I couldn't find the black gel frosting anywhere! It's on my receipt, but not in my house! Rgg... Light purple was cute enough.

Whatever purple frosting wasn't used went into a gallon size Ziploc bag. I snipped a hole in one corner to create a makeshift pastry bag. I started just below the middle of the cupcake and spiraled out the trunk, getting smaller as I went down over to the right.

Then I cut the Almonettes into quarters and put them above the trunk.

Here is where I realized I was taking to much time with the camera! The ears could have turned out much better, but I piped frosting over the cookie. I also placed the remaining white frosting in another ziploc and piped on eyes right above the nose. I thought I got a better pic, but... like I said.. my camera died.

To end I simple used so green gel I had to finish off the eyes. I used the star tip with the pink squirty can to make the "clover" and put one pearl on each for the "speck"!

While I personally hate the ears, nobody complained about them and they were all eaten. Apparently... lots of frosting is a good thing! Most just held their cupcake and stared at it. "I can't eat it! It's to cute!" LOL

I must say that Horton failed miserably to save that Speck several times that night. Poor Horton...
Wednesday, March 2
Cat in the Hat Lunch
Ok.. this one has got to be my favorite Sandwich Creation so far! I just love Dr. Seuss! I could probably do a whole blog on just Dr. Seuss! His work inspires so many crafty ideas! Happy Birthday today Dr. Seuss!
Tyton says he tasted yummy. "Even the drawing. Mom, I didn't know your drawing tasted so good!" He is talking about the mouth there. He was pretty skeptical.
Tuesday, March 1
Very Important People!
UPDATED
It's amazing the amount of paperwork that comes with existing isn't it! Being in the military it seems that we are constantly needing to pull out important papers over and over, whether is birth certificates so we can cross borders, or shot records so we can sign up for soccer! I've decided it's time to put all our most important things into one place so we can easily move and travel with them. It can be difficult to travel with a file cabinet in your suitcase! (I've never actually done that, but... I know my papers tend to end up in a pile instead of back in the file cabinet.) So begin a journey with me as we attempt to put our paper life into order! That being said... lets start the fun!

First we are going to start by getting our file system together.
Subscribe to:
Posts (Atom)