Friday, May 18

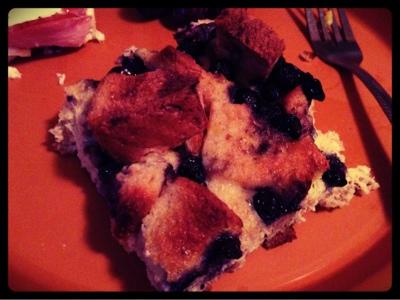
Overnight Blueberry French Toast

I found a recipe via Pinterest from RealMomKitchen.  YUMMY!  BUT...  My hubby HATES cream cheese and, unless in a cheesecake, I am not a fan either!  So... this is my adapted recipe for the same thing but without the cream cheese!
Overnight Blueberry French Toast
12 slices of bread, cubed (They recommend Texas, I used my regular ol' wheat!)
1 Cup of Blueberries (I used Frozen)
12 Large Eggs
1/3 Cup Maple Syrup
2 Cups Heavy Cream!  LOL (She used milk...  but... YUM!)

Spread your bread cubes into a 9 X 13 pan.  Sprinkle with your blueberries all over the top.  In a separate bowl mix the milk, eggs, and Syrup.  Then pour that over the top of your bread and blueberries.  Cover this all with foil and put in the fridge overnight.  I did this in the morning and we had Brinner!  (Breakfast Dinner)  Bake at 350 for about 30 minutes and DONE!  Yummy!
I served it with maple or blueberry syrup (my kids like blueberries, but not the syrup for some reason!)  And whip cream!  Yum!

I also served this with my Canadian Egg Boats!  They are a huge hit with my kids.  I think because it has the word Boat in it!


Wednesday, May 16

S'mores Trifle or Bowl of Popcorn


This is an easy recipe.  It comes out yummy and, if you add the finishing touches, is sure to be a success at any party!


Ingredients
2 Pans baked brownies, crumbled 
2 Cans Chocolate Hershey's Frosting
2 packs of Graham Crackers
1 Cup of Melted Butter
1/2 sugar
1 bag mini marshmellows
2 jars Marshmellow Fluff

So...  I forgot to take a pic of the first step, but pretty much just crumble 1 pan of brownies and dump them into the bottom of your bowl.
After pressing them down packed layer over them with some chocolate frosting.
In a seperate bowl crumb 1 pack of your graham crackers, add some of your melted butter and 1/4 cup of sugar.  You really just need enough butter to get your graham crackers to stick together in clumps.  Then dump them  on top of your frosting layer.
Plop in 1 jar of your marshmallow fluff.  This step works better if you plop several spoonfuls all around.  This stuff is sticky and doesn't like to spread!
Then do another layer of the brownies!  (Yeah!  I got a picture of the brownie step somewhere!
Then repeat the chocolate frosting layer.
After adding another graham cracker layer STOP!  Don't add the next marshmallow fluff layer yet.
(THIS STEP YOU CAN SKIP AND JUST DO PLAIN MARSHMELLOWS! It just looks cool this way.)
Next you are going to break out the mini marshmallows.  Using scissors I would snip one almost all the way in half and poke another one inside.  
Then sorta smush them together so they stick.  Do this with the whole bag!!
AFTER you make your marshmallows THEN put the marshmallow fluff down.  
I made the mistake of doing the fluff first... then putting the marshmallows on as I went...  They are heavier than the fluff so the sink it!  I stopped and did them all, but then the didn't stick to the fluff quite as well...  Alright though...  I did it fast!
Next I watered down some brown gel coloring and touched some of the piddles with it to look like the kernels.
Last I put some watered down yellow in a tiny spray bottle and spritzed the top!  
Buttered popcorn!
I covered it with plastic and tied a cute ribbon on it for looks!  This was going to an auction to benefit the youth at our church to help send them to camp.  It brought it $50 bucks!  Go me!  I just think it looks awesome!  Although...  I did have a popcorn craving when I was done.

Monday, May 14

Even Easier I Spy HST Quilt

I made this quilt to give to an auction at our church.  The money was given to the youth to send them all to camp this summer!  Such a fun auction called for a fun quilt in my opinion!

Now...  I am a huge fan of I Spy Quilts.  I wanted to do one forever and now I can't seem to stop!  The are colorful, fun and... snuggly!  I can't seem to just throw the square together though... they must be have some sort of order to them...  

This quilt is VERY similar to my Super Easy HST Quilt.  They are pretty much the same, but... The way I organized the colors and then what I swapped is different.  Practice makes perfect, but... here it made it easier!!
I started out with 80 squares that I liked.  I layed them down and tried to get like colors close.  I wanted them to flow across the quilt at this stage.  Then I broke them into 4 sections each 4 across and 5 down... so 20 squares in a section.  I then sewed the 4 sections together!
Then I cut the sections as shown.  Along the diagonal across 3 squares in 2 corners of each section.
I the 4 center and 4 outer triangles are going to stay where they are.  I didn't sew the middle ones together yet...  I just moved them closer together for the pic...
I then rotated the funky middles clockwise.  Yeah... the quilt went from tall and skinny to short and fat there...
Then I pulled in the 4 corners.  I sewed each section individually.  Fixing the triangles back to the wonky middles.  Then I sewed all 4 sections together in 1 big quilt!
Here are my kids testing to see if it is big enough...  all 3 fit so.. yep!
I love it!
It's easier than my easy one!


Saturday, May 12

Kids Chore Charts

There are so many Chore Charts out there, but I had to share mine!  It has been working like a charm for us so far!  I love having help too!  When I first started thinking of the kids charts I decided that this time I would have to make myself a chart first!  While I never have had complaints about, "Why do I always have to do ____."  I didn't want them to start!   So I made myself a chart first!  To see that post CLICK HERE!

I love having the help and I think it helps them that my chart is right above theirs.  They see that mommy has done hers, so... time to do theirs!  No complaints so far!  In fact, I have hardly any complaints so far.  Maybe it's because they have THEIR chores and they do them sort of as they can. 

Anyways... on to the charts!
I started with 1 batting and 2 fabric pieces cut to 4 x 18 inches.
Then I layered them batting, fabric facing up and then fabric facing down.  Then I sewed around the edges EXCEPT for...
A small hole where I could flip the thing right side out!
Here it is right side out and pinned to stay.  I then sewed again about 1/4 inch from the edge.
I then used my machine to stitch TO DO   TO DO   TO DO along one edge and ALL DONE   ALL DONE....  along the other!  This part you can skip if you don't have an embroidery machine OR if have a steady hand you could use a fabric marker or maybe T-Shirt paint? 
I then hot glue the fabric strip to a Gigantic letter A, because... this one is for my daughter whose first name is Aurora!
I glued some magnets to the back so it could hang on the fridge.
We use cloths pins to mark the chores.  When one is done she moves it to the other side!  I made of for my son too, but I haven't been able to find a Gigantic T yet...  Hmm... 
I like the clothes pins because they have some chores they do every day, but some that I would like for them to take turns doing!  At the end of the week we take those chores off and they draw them out of a bag or bowl or whatever I have handy!  It has been working like a charm so far.   We pay them in nickels, except for the ones like homework...  I give it to them at night and the put the ones they need to do the next day on the other side!  

Thursday, May 10

Visiting Teachers Calling Cards

This is one for my fellow LDS friends.  Every month the women in our church (if they want) go out and visit a certain few other women!  Just our way of checking in of each other.  The presidency of the women's group, The Relief Society, in our individual wards decides who we will visit.  Who you visit depends on alot...  where you live, age, but most of all prayer.  Really the idea is to uplift each other with awesome girly companionship.

Every month there is a message we are asked to share with those we visit.  Last month it was on actually on what a visiting teach should do for those she visits!  You know how when you plan a lesson you always learn more than those to whom you are teaching?  I know I learned a ton in this one!  I have never been the best at getting out every month.  

So...  As inspiration and in hopes that those I visit will want to contact me more if they need me, I created these little cards!

FIRST  I usually print out a handout someone else has created.  SpirituallyThinking always has a great collection!  This month I downloaded #20 on her list.  But then I created a little something for them just from me!
Next I made these!  Visiting Teaching calling cards!  They just happen to match the theme this month.  I figured it was a small way for me to be a little more accessible for the ladies!

 The little ones on the left are business card size and underneath the fancy paper towel phone number cover ups... is my name and phone number!  The bigger ones are the same.  After laminating both I stuck a magnet on the bigger ones so my number is EVERYWHERE!!!  lol

Anyways... to download your own blank ones just click the links below!

Tuesday, May 8

Candyland Spelling Practice

I enjoy finding new ways for my daughter to practice spelling.  I think because I was never a huge fan of homework...  seriously... who is right.  
Anyways!  We got this game for christmas.  I didn't want to ruin the cards that came with it so I made new Candyland ones!  Then I laminated them and wrote her spelling words on them with an Expo marker!  YEah...  they have to be a little careful while playing but still! Fun right?  
In order to move the first had to read the word, then spell twice to drill it into their little skulls, then read it again!  We had so much playing!

So if you would like to download your own blank cards just click the links below!
Blank Candyland Cards (NEW Version)
Blank Candyland Cards (OLD Version)

Monday, May 7

My Weakness...

Yes.  It is true I have a weakness.  I do great grocery shopping.   I make a meal plan and then a list and buy pretty much just what I need.  I do even more awesome REAL shopping.  You know... the kind where you get to buy shoes and clothes.  You see...  I don't!  Unless I happen to be with my mommy and sisters on vacation and then...  yeah.  I am married with kids and a spoiled brat!  My parents still love me!  The only time I seem to do real shopping is if my kids need clothes or shoes and then I always hit the Consignment shop in base first!  I figure...  I will abuse the privilege before my kids are old enough to care what brand they wear.

Anyways...  It seems that every person has a shopping weakness.  That one thing that, even though you don't need it, you HAVE to buy.  I wish I could say that my shopping weakness is shoes.  But alas...  it is much more strange than that.

My name is Jessica.  And I am a sandwich cutter addict.
I admit.  The collection above seems small.  But...  my collection is ever more vast than this.  You see...  when putting our things in storage I was worried about keeping out the basics.  Clothes, shoes, and favorite blankets.  A sandwich cutter is a neglected thing.  I feel bad for storing them.  Picture above are the dolphin, star, butterfly, and puzzle cutters I have bought just since we moved here to florida.  My true collection includes:
Dolphin
Star
Butterfly
Puzzle
Elephants
Penguin
Dinosaur
Heart
Circle
and Simple Square Crust Remover!
Yes.  I have 10 Sandwich cutters.  Why?  Besides the fact that I have 3 kids and a habit of creating fun random shaped lunches?  Because they are fun! Plus, they are always cheap so I never feel guilty picking them up!

Here are the kids sandwiches from lunch!  See...  so much fun!  They never know what shape they will get!
Will I ever beat this habit?  Probably not for a while.  But it could be a worse habit!
Right?

So.  Here is a question for you.  What is your shopping weakness?

Sunday, May 6

Color Rings I Spy

After finishing my Fall Leaves Sister Quilt I asked my kids what type of quilt I should sew next!  My mom has been helping me collect a TON of fabrics and through swaps on QuiltingBoard I have scrappy collections of so many types of fabrics it would be silly to list them.  Anyways, my daughter says, "Make one for me!"  Our 2 year old them copies and says, "ME me me!"  Then my son Tyton says, "You could make one for Grandma!  Or...  Daddy!  Or...  Aunt Marina.  Baby Taeli would like one too..."  Anyways he named just about everyone under the sun EXCEPT for himself.  So I decided to make one for him!"

He is my kids who whips through I Spy books and puzzles like nothing.  So deciding to make an I Spy quilt came without question!  My hard thing is...  While I love scrappy quilts, I Spy quilts tend to have a TON of colors and I am a crazy person who needs it to somehow match!  When doing the Super Easy HST I Spy for my niece I attempted to use fabrics with certain colors.  I decided to go along with the same thing here, just using a different pattern.
The pattern on this one is easy to see.  I did rings of colors!   I used white in the middle, then a ring of green, then black backgrounds, then blues, that a row of browns that I cut in half because...  I didn't have enough browns!  Made a pretty cute Boyish I Spy!
I found the fuzzy shark fabric at Joann's and used a trusty 50% off coupon!  I figured... it's an I Spy so if can be backed in ANYTHING!  Plus... there weren't any sharks on the front to spy!
I did a simple pattern so it was done in a few days.  I worked on it while he was at school.  I gave it to him one day after school when he had been especially good.  He was so excited!  
He immediately laid it out on the floor and they all played I Spy for about an hour!  Seriously... snuggly fun!

Honestly... the hardest part for me about this quilt was the giant fabric mess I made sorting through fabrics and trimming to get the right colors!  I do keep all the I Spy fabrics in one little bin so it's not to hard and... since most of them are from a swap they are already cut to size.  Gee...  this quilt was not that hard.

Honestly I just wanted to show one way to do a cute I Spy that... matches.  Cause....  I need things to match!

Friday, May 4

Egg Boats with Canadian Bacon

My kiddos call these Eggs Muffins!  I don't care what you call them... they are simply awesome!
First you are going to need a muffin tin, a pack of canadian bacon and some eggs!
First I sprayed my pan, probably not necessary because of the greasy bacon, but I didn't want to risk it.  Then I cut 4 slits in the bacon (I picked canadian cause it was round!)
The cuts help it fit in the tin better.  
Then I cracked an egg into each cup and sprinkle with salt and pepper.
Then bake at 350 for about 25 minutes!  We like the yolk cooked all the way through, but... if you like it runny then cook it less!
See!  Yumm!
And they even re-heat fine if you have leftovers!  Which...  you shouldn't but I always cook extra!

Wednesday, May 2

Mini Braids and a Side Pony

We are always on the look out for awesome swim hair.  Hope you enjoy this one!
I started with slightly wet hair so it would stay where I wanted.
Then I grabbed a chuck of hair from the front and braided it.  
When finishing it off with an elastic I grabbed a chunk of hair from the bottom and tied them together.
Then I picked another chunk from the front and again secured it in the back, but a few inches from the first one.
I did a third and secured all the hair in a side pony!
I think I will do 4 next time and start even further over!  It so easy and cute!